Share
High Dynamic Range Photos HDR in Photoshop CS3
I’ve been hearing about HDR (high dynamic range) photos for a while. For those of you unfamiliar with the term, it’s the process of combining m...

I’ve been hearing about HDR (high dynamic range) photos for a while. For those of you unfamiliar with the term, it’s the process of combining multiple exposures of the same scene into a single photo to create an image with a wider range of properly exposed tone. This is particularly helpful when you have a scene with really bright whites and really dark shadows.
I’m increasingly intrigued with how technology can alter the way we approach the creation of art, and how it makes the formerly impossible, possible. For example, the discovery of “perspective” in art created a huge transformation in painting. As I commented in a previous blog entry, I feel the high-sensitivity, low noise sensors in the most recent crop of sensors has also made a new range of photography feasible.
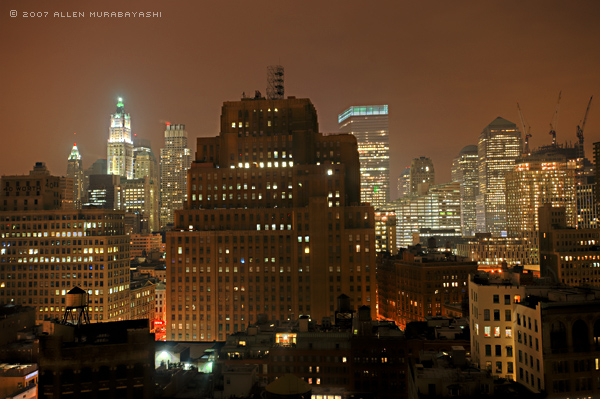
So here’s my first attempt at HDR photography. I took 9 frames of the same image on my Nikon D3 bracketing the exposure from only exposing the highlights (so that most of the frame was black) to only exposing the shadows (so that most of the frame was blown out). I tried processing them with the “Merge to HDR” command in Photoshop CS3, but unfortunately, my G5 Mac wasn’t liking the huge file sizes and intensive computation. So I had to try it with 3 downsized photos.
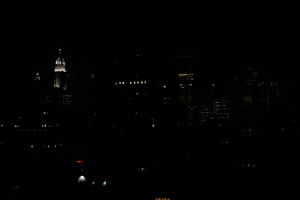
Here’s the image exposed for the highlights.
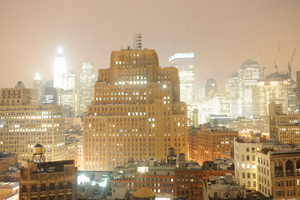
And the image exposed for the shadows.
A few things of note:
– I processed the “original” version with Nikon Capture NX, which uses the native conversion algorithms. The result? Well, the conversion is pretty darn good. Colors and contrast in particular seem really great to my eye.
– The HDR version is processed with Adobe’s Camera RAW plug-in, which is a reverse-engineered conversion process. Nikon’s RAW format is proprietary, so Adobe has to do a best guess to convert it. I find that saturation usually suffers the most.
– That said, you’ll notice that I was able to control the highlight areas of the HDR version significantly, so that the overall effect is quite nice. I retain good shadow detail, and don’t blow out the highlights that occur when I’m only using a single exposure.
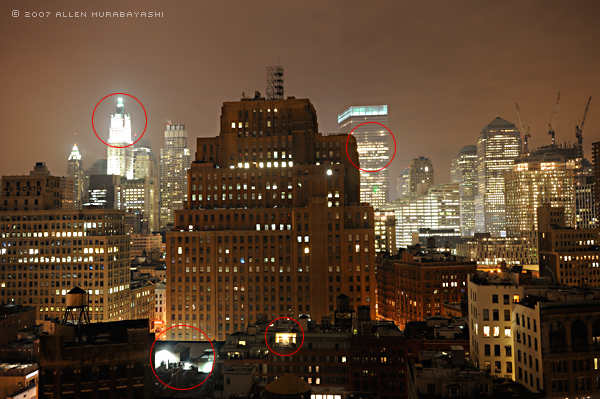
Here’s a single exposure image for comparison. I’ve circled the blown-out areas in red.
I’m sure that an experienced HDR person could do a much better job, and I’ve certainly seen scenes that work more effectively than this (e.g. dramatic clouds, sunsets, etc). But it’s an interesting technique to consider, particularly as a way to give travel imagery a real pop. But like a lot of techniques, I get the feeling that you can get consumed with overprocessing the scene such that the content and composition become subjugated, and suddenly the art is gone.
Next Post: Merry Christmas! FOX has Stolen Your Photo!
Previous Post: Getty Images’s Blue Light Special
You May Also Like
-

Expert Advice and Top Tips from Pro Photographers for 2024
What’s one piece of advice you would give to aspiring or up-and-coming photographers? We asked nine experienced photographers and PhotoShelter members to share their top tips for those looking to get ahead in their photography careers. From finding your own visual voice to working with a mentor or photo assistant, each piece of advice listed […]
-

What’s On Your Photography Holiday Wish List?
The holiday season is around the corner and that means it’s the perfect opportunity to upgrade your gear or find that special gift for the visual storyteller or photography enthusiast in your life. We reached out to a handful of renowned photographers and PhotoShelter members, each with their unique styles and preferences, to bring you […]
-

Share a Photo That Means the World to You
We all have a photo that means the world to us. Maybe it’s one we made ourselves – the first photo from our first camera. It could be an old family photo in a beloved photo album. Or maybe it’s an iconic image that hangs on our wall at home. With World Photography Day coming […]