Share
Electronic Copyright Registration for Photographers
Each time you take a photo, that image is copyrighted. Assuming that you can prove that you took a specific photo, then misuse of that photo could ...
Each time you take a photo, that image is copyrighted. Assuming that you can prove that you took a specific photo, then misuse of that photo could lead to monetary compensation. But the truth is that most intellectual property lawyers won’t touch your case unless the image has been registered with the US Copyright Office. A copyright protects forms of “authorship” (as opposed to trademarks and patents which protect marks and inventions), and registration confers significant legal benefits to the photographer, namely that you can claim statutory damages of up to $150,000 per image infringed.
A non-registered image isn’t eligible for statutory damages, however, the infringed party can seek actual damages and “disgorged” profits (which in some cases can exceed the statutory limit). The amount of compensation can vary in size, and based on a judge’s interpretation of “willfulness” of the infringer.
For example, if a nefarious publisher uses your unregistered image of a grizzly bear in a magazine, you might be able to claim a few hundred dollars (i.e. not enough to pay the lawyer). But if the image is registered, you could get up to $150,000 in statutory damages.
Nuances of “Infringement”
Statutory infringements are assessed on a per image basis, with a single award available even if there are multiple infringements. If the nefarious publisher uses the grizzly bear image in a brochure and an ad, you’re only eligible for $150k in statutory damages, not $300k.
Additionally, if the nefarious publisher grabbed your images from a single magazine, or single website, there is also only one statutory damage available. The essay of grizzly bears ripped from your website and used in an ad is still only eligible for $150k.
Registration has a huge benefit, so make sure you register your images regularly.
There are numerous resources on how to register images manually, so we’ll focus on electronic copyright registration.
Electronic Registration
In 2008, the US Copyright Office began accepting electronic registration of images through their eCO system (Electronic Copyright Office). Prior to that, a photographer had to burn a CD or DVD of work, fill out a form, and mail in the application with a check. Electronic registration has several key benefits over manual registration:
– Lower filing fee of $35 (per case, which may include multiple images)
– Faster processing times
– Online status tracking
– Online payment
– Online upload of images
Create an Account
Fill out your name and login information.
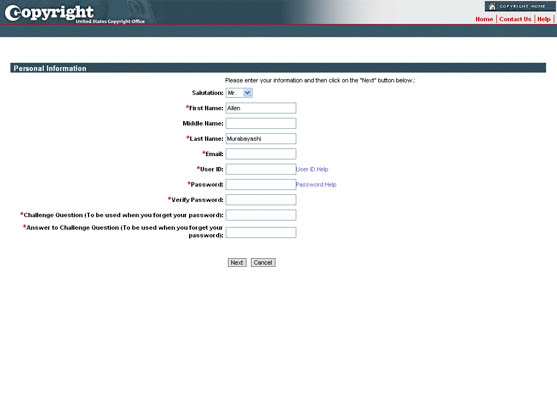
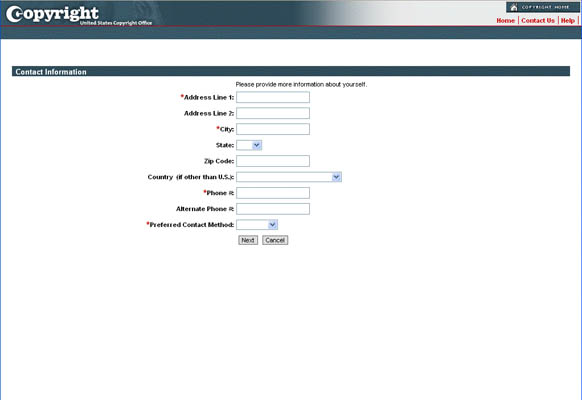
Fill out your address information. Remember, some of this information will be in the public domain, so if you have privacy concerns, you might want to use a P.O. Box.
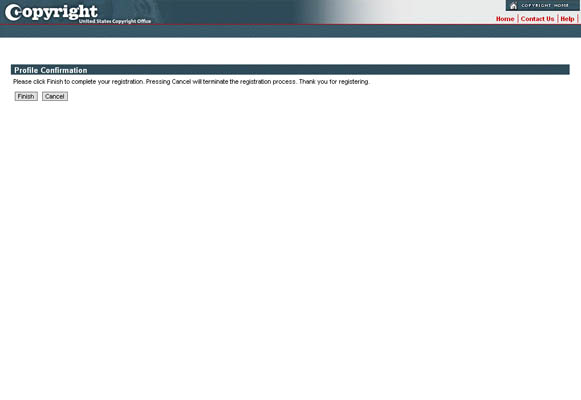
Agreeing to the US Copyright Offices terms is done by clicking “Next”.

You are automatically logged in and forwarded to the homepage.
Navigating the System
Navigating eCO isn’t particularly intuitive, nor is the system very bulletproof (i.e. I’ve encountered a lot of errors from which I could not recover). Here are a few hints:
Navigating eCO isn’t particularly intuitive, nor is the system very bulletproof (i.e. I’ve encountered a lot of errors from which I could not recover). Here are a few hints:
- Make sure you hit “Save for Later” whenever you can to avoid unnecessary data loss. Unfortunately, when you click “Save for Later,” you’re always redirected to the homepage.
- From the homepage, any incomplete applications are referred to as “Working Cases”
- Click on the claim # to continue editing
- Here’s where it gets weird. When you click on the case #, you are taken to the summary page for the case. The only way to navigate to the different pages of the case, is by clicking the “back” button in the page (not the browser back button). There is a table on the right of the screen that shows you where you are, but it’s not clickable.
Registration is a multi-part process:
1) Fill out information about your images and upload your images.
2) Add that “case” to your shopping cart (because each “case” has a separate registration fee).
3) Checkout/final submission.
Published or Not?
Before you start the process, you need to separate out images that have been published vs. unpublished. Even though you can submit lots of different content, you cannot mix published and unpublished content, so make sure you have organized your work accordingly.
What is Published?
Books and magazines are obvious forms of publication. The copyright office is a bit more vague as to whether putting an image on a website constitutes publication. Specifically, they indicate:
“However, ‘publication’ may include the public distribution of copies by means of electronic transmission (e.g. over the internet). The applicant, who knows the facts surrounding distribution of copies of a work, must determine whether the work has been published or not”
PART 1:
Filing a Claim
Click the “Register a new claim” link on the right navigation. Note that the US Copyright Office uses “claim” and “case” interchangeably during this process. There are three main parts of electronic registration, and the system will take you through them serially.
Click “Start Registration” to begin.
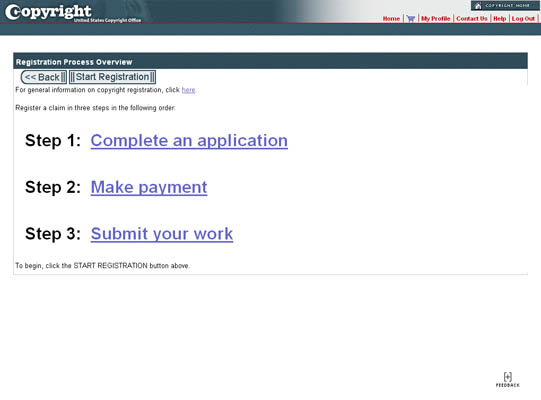
Select the type of registration. For photos, select “Work of the Visual Arts”.
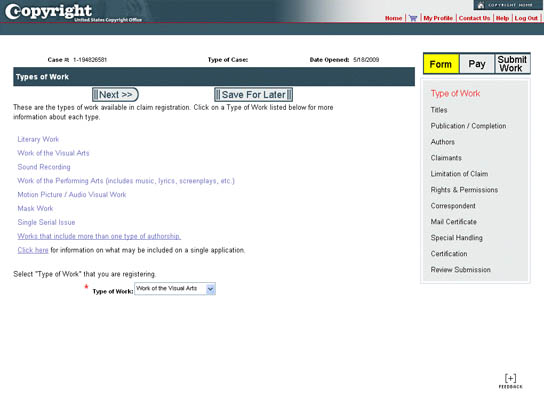
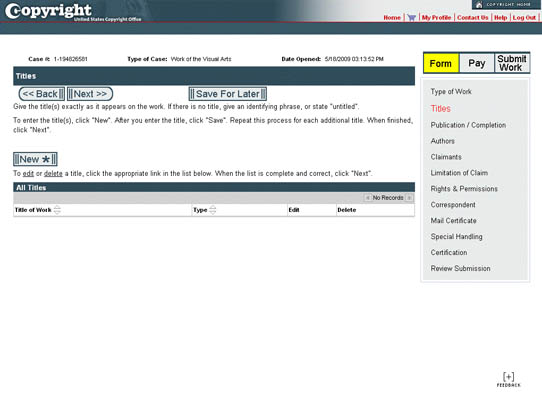
Your images need to be aggregated – whether logically or arbitrarily. We do this by creating a Title of the work. Click the “New” button to proceed.
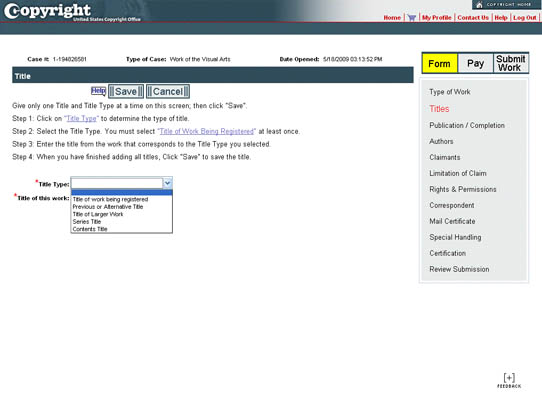
In most cases, you will select “Title of work being registered” when you have related images. The title of this work can be anything description. For example:
– President Obama’s Inauguration
– John and Nancy’s Wedding Reception
– Dance Images from July 2008
You could also have more arbitrary groupings:
– My Work 1999 – 2009
– Ziggy Zaggy xlkdj!
Click “Save” when you’ve entered the information.
There’s no limit to the number of images that you can register at one time, and since the registration fee is per submission, it makes sense to add as many unregistered images as possible. You can continue to add Titles as needed.
You should have predetermined whether the works you are registered have been published or not. Select the appropriate option. Non-published works only require a year of completion.
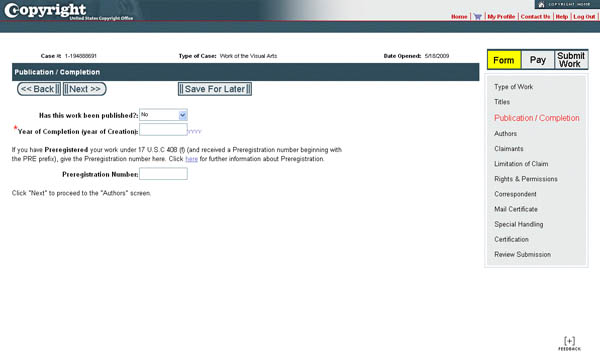
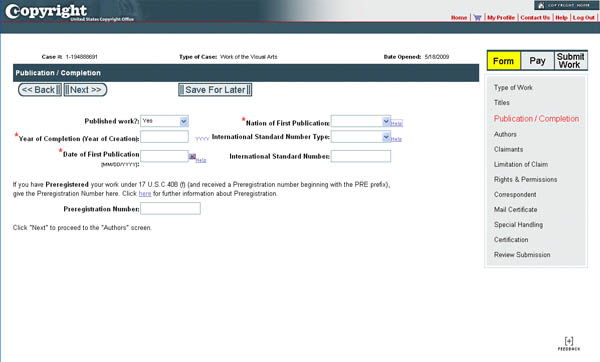
Published works additionally require a date of publication and nation of first publication. Published works have to be grouped per publication per claim (aka “unit of publication”) because there is no way to affix multiple dates of publication to the form — i.e. only images from a single publication on a single date can be included. If your images don’t fall into this category, you have to either 1) submit then electronically under different claims (and therefore incur more fees), or 2) use the paper form VA. You cannot mix unpublished outtakes with your published images.
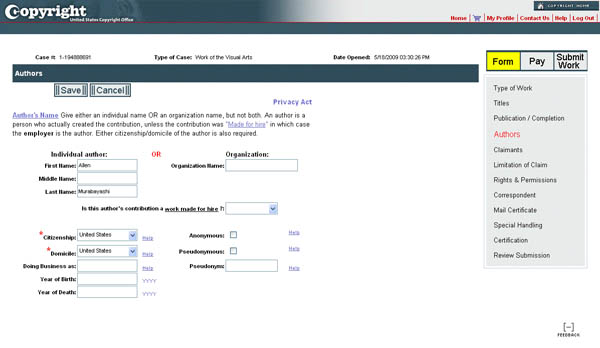
The Author is most likely you, so click the “Add Me” link, and fill out the form. Even if you have a business name, you still might not want the “organization” to hold the copyright. “Domicile” is your country of residence.
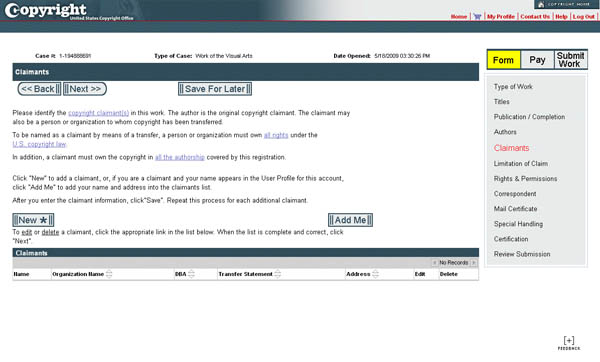
The Claimant is you, unless you have transferred your copyright. So click “Add Me” once again.
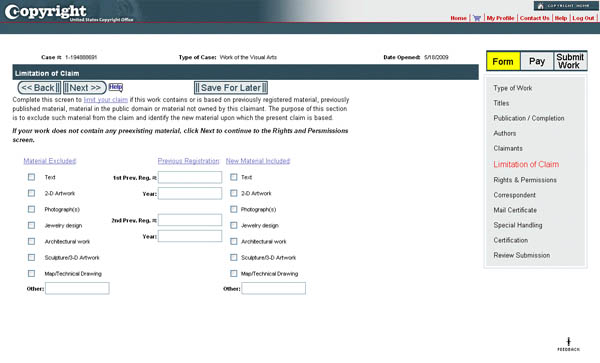
 Unless you are an “visual artist,” you probably have not based your photos on previous works. So 99% of the time, you’ll skip this section by clicking “Next.” However, if you are creating composite images that use multiple source images (particularly those not shot by you), then this section is of importance.
Rights & Permissions Contact gives you a way to affix public contact information to the images. So if someone finds your image through the Copyright office, they will also be able to see this optional contact information.
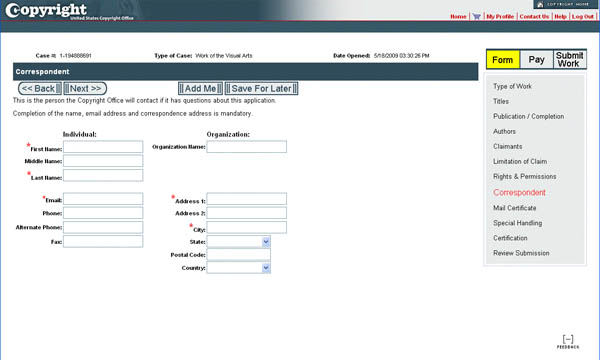
The Correspondent information is who the Copyright Office will communicate with if questions arise. In most cases, that’s probably you, so click “Add Me”.
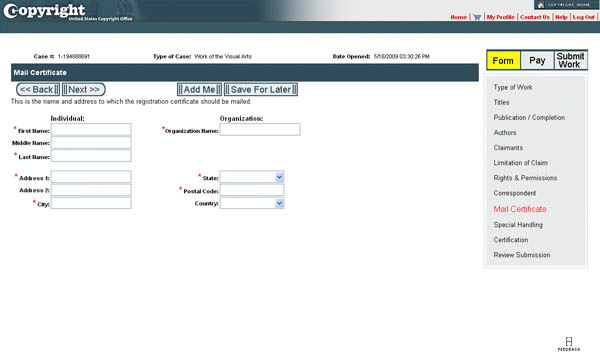
Mail Certificate is where your registration will be mailed. In most cases, that’s probably you, so click “Add Me.”
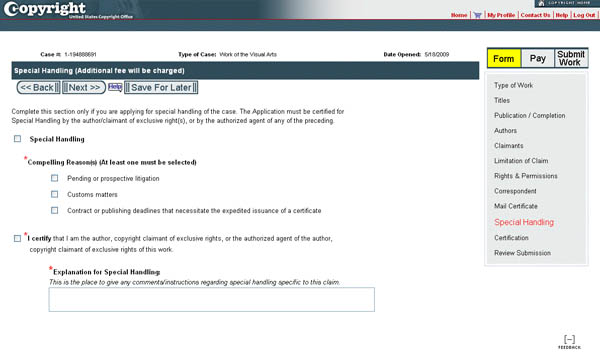
Unless you’re in litigation or engaging in litigation, leave the “Special Handling” blank and click “Next.” (Also note that there is an additional $685 fee for special handling.)
Fill out the Certification page, and check “Upload electronic file.” The uploading of files is done after you pay for the registration. Any claim that hasn’t been submitted yet has the status of “working.”
PART 2:
Adding the Claim to your Cart and Payment
Review your submission to check for any errors. When you are satisfied with the contents, click the “Add to Cart” link.
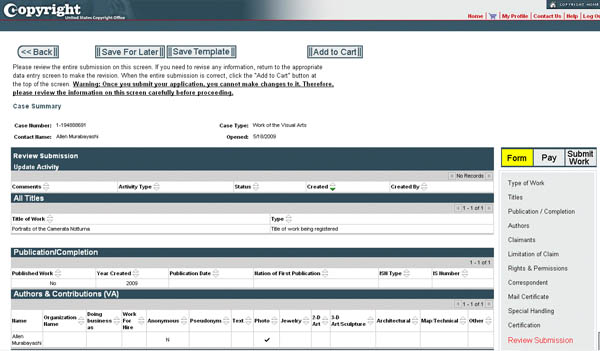
After you’ve added the claim to your cart, you can review it once more before proceeding to the payment by clicking “Checkout”
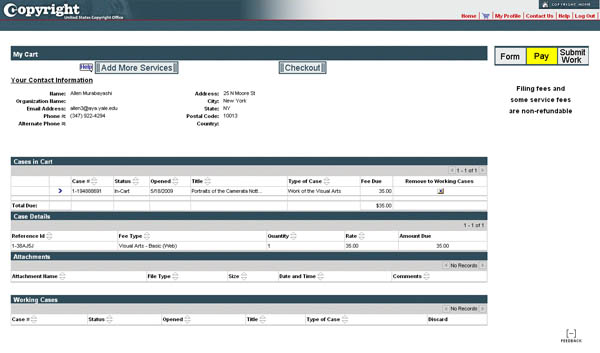
Select your payment of Credit Card/ACH or Deposit Acct.
Payment is transacted on pay.gov, which is run by the US Treasury. A warning screen indicates that you are leaving the eCO site.
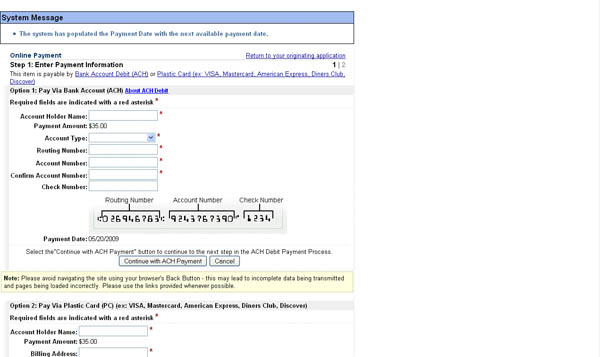
If you’re paying via ACH, fill out the top box. If you’re using a credit card, fill out the bottom box. This non-intuitive layout is courtesy of the US Government.
 If the transaction is successful, you’ll be redirected back to the eCO site. Click “Next” to upload your images.

PART 3:
Uploading Files
Usually, you’ll be registering multiple images at once. In this case, I suggest creating a zip file of images. The Copyright Office doesn’t give any specifics on the size of an image, but clearly, it has to hold enough detail to be identifiable. I’ve settled on a 300 pixel wide image, which I create using the “Image Processor” function in Photoshop.
Because you might be submitting multiple titles, it makes sense to name the zip files similarly to your titles. File names don’t really matter, although, it makes sense to adopt a logical naming structure in case your images get scrambled somewhere along the way. You definitely should embed meta data into the image (copyright and contact information).
The upload mechanism will time out after 30 minutes, so depending on the speed of your connection, you’ll have to figure out what size ZIP file you can upload without running into problems. Once you’ve completed the upload, you’ll receive a confirmation notice.
Many high volume shooters mail a DVD or CD because they’ve encountered issues with the timeout even when they have small thumbnails. Note that the registration date is not when you submit the form, but when the Copyright Office receives your images.
Click the “Upload Deposit” link on the appropriate Case# line to submit your images. DO NOT click “DONE” until you’ve uploaded your images!
Select a file(s) from your computer by clicking the browse button. The Item Title should correspond to the work’s title that you entered during the initial process. Click “submit files to copyright office”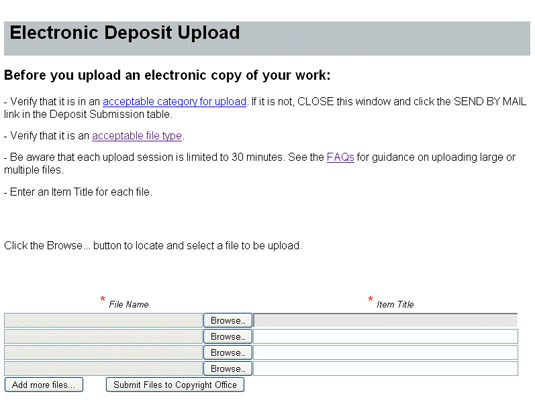
A progress window will give you a status of the upload.
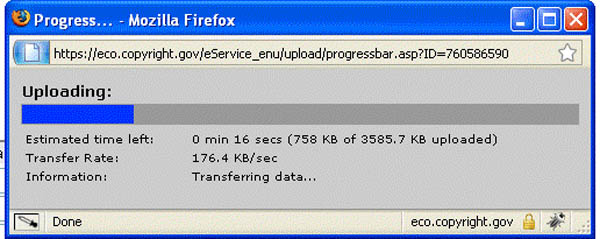
You will see a success message upon completion. Click “Close Window.”

When we tried it, we didn’t see the attachments appear in the section below. But since we had a confirmation number, we assumed everything was ok. Click “Done” to finish up the claim. You are redirected to the homepage.
The case is listed as “open” once you have submitted it, but while it’s awaiting a response from the Copyright Office.
You will receive two e-mails:
- an Acknowledgement of Receipt from the US Copyright Office
- a payment confirmation from Pay.Gov
You can always check on the status of the registration by logging back into eCO.
How long does it take?
From start to finish, it took about an hour to complete the process of:
– Creating an account
– Familiarizing myself with the screens
– Creating a case and adding the information
– Resizing and zipping up the images
– Submitting payment
– Uploading the images
For multiple “titles” under a single case, I suspect the bulk of the time will be in organizing, resizing and uploading the images. The main impediment to working faster in the eCO site is really the usability and interface design.
Notification
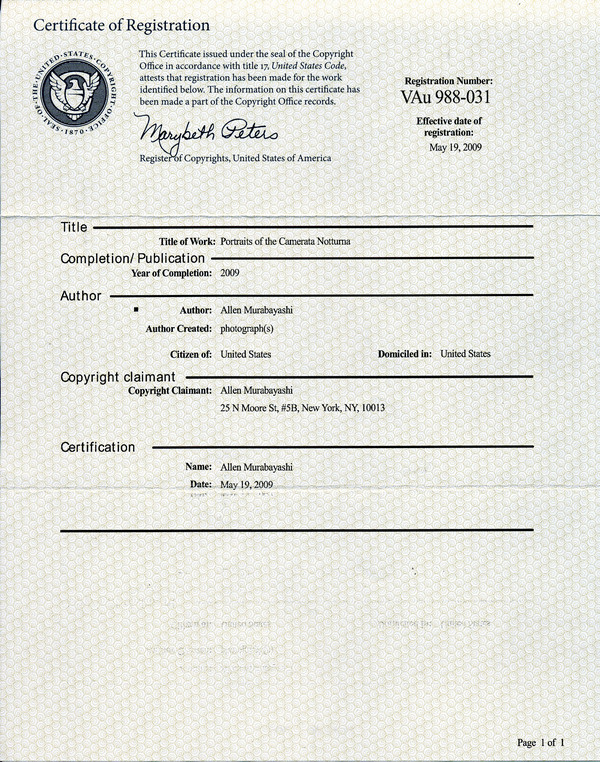
On July 8, 2009, less than two months after the images were submitted, I received a notification from the Copyright Office of the successful registration.
FAQ
Do images that are delivered to a client constitute “publication”?
Not necessarily. The Copyright Act states that delivery to a “group of persons” can be publication, but most experts think delivery of files to a company would generally fail the litmus test for publication.
Are there consequences for mis-registering an image as published or unpublished?
If in doubt, register the image as published. The Copyright office allows you to amend the registration from published to unpublished, but not the other way around. There is also no need (nor should you) re-register an image when it moves from unpublished to published. The risk is that you lose an infringement on a technicality, which we don’t want to happen.
I heard that I can group different publications together in the same registration. But you said no. What’s up?
The paper form allows you to register multiple publications, but the eCO system does not.
I put images up on my personal website. Does that constitute publication?
Absolutely. You must register these images as “published.”
APPENDIX:
- Move to Electronic System Means Long Waits at the US Copyright Office – Washington Post
- Copyright Critics Rationalize Theft – Wall Street Journal
- A Walk Through the Copyright Office – Photo Business News & Forum
I’d like to extend a huge thanks to Jeff Sedlik of the PLUS Coalition for correcting a number of factual issues regarding copyright law and the registration process. Jeff has worked directly with the US Copyright Office for several years to elucidate and improve the registration process for photographers.
This information is for educational purposes only, and does not constitute legal advice.
Previous Post: Dude, Where’s my Blog? And other SEO thoughts on photo blogs
You May Also Like
-

Expert Advice and Top Tips from Pro Photographers for 2024
What’s one piece of advice you would give to aspiring or up-and-coming photographers? We asked nine experienced photographers and PhotoShelter members to share their top tips for those looking to get ahead in their photography careers. From finding your own visual voice to working with a mentor or photo assistant, each piece of advice listed […]
-

What’s On Your Photography Holiday Wish List?
The holiday season is around the corner and that means it’s the perfect opportunity to upgrade your gear or find that special gift for the visual storyteller or photography enthusiast in your life. We reached out to a handful of renowned photographers and PhotoShelter members, each with their unique styles and preferences, to bring you […]
-

Share a Photo That Means the World to You
We all have a photo that means the world to us. Maybe it’s one we made ourselves – the first photo from our first camera. It could be an old family photo in a beloved photo album. Or maybe it’s an iconic image that hangs on our wall at home. With World Photography Day coming […]