Share
Six Standout Night Photography Tips to Help You Master the Craft
Photo by Grant Kaye/180-degree panorama of Racetrack Playa in Death Valley National Park, CA. Photographers who specialize in night photography and...
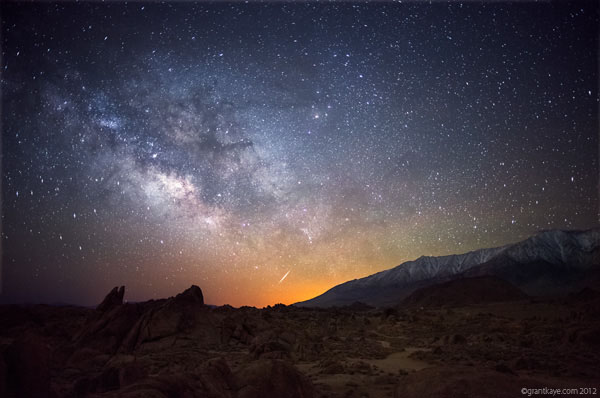

Photo by Grant Kaye/180-degree panorama of Racetrack Playa in Death Valley National Park, CA.
Photographers who specialize in night photography and stair trails are somewhat of a special breed. This isn’t so surprising when you realize how much in-depth understanding and science know-how they must possess in order to get the job done – not to mention the specialty gear required to get a quality shot at night.
But don’t let the fancy equipment or the prospect of staying up all night discourage you from pursuing night photography. After speaking with Lake Tahoe-based time-lapse and night photographer Grant Kaye, who was featured in our Selling Nature Photography guide, we compiled the top 6 night photography tips to help you master the craft.
Background
Grant started to seriously pursue night photography when he was working fulltime as a volcano specialist – meaning the only time he had to photograph was after work when the sun had already gone down. “I gravitated to night photography after realizing that I could still make images on days that I had to work until 6pm,” says Grant. “Once I got hooked, I had to learn everything I could about shooting at night.”
Four years ago, Grant gave up his work with volcanoes and started to pursue photography fulltime. But how did he make the move from enthusiast to professional? That’s where Grant’s night photography tips for both style and technique come in handy.
1. Combine elements to create an artistic interpretation.
Grant rarely photographs just the night sky alone – he almost always seeks out unique elements in the landscape to combine with his night shots. The result is images that are based on reality, but contain his artistic interpretation of a scene. “I prefer to shoot in places that have both dark skies and interesting things in the landscape to combine with stars and other extraterrestrial objects,” explains Grant.
The elements that Grant chooses to include in his composition come in all shapes and sizes. It’s often the rugged or funky-looking trees native to the American Southwestern deserts, or a group of jagged rocks alongside a placid lake. The elements don’t take away from the starry skies, but actually add a focal point that draws the viewer into the entire image.

Photo by Grant Kaye/White Mountains, CA.
Grant encourages aspiring night photographers to play around with their surroundings, and not to give up when they don’t see their ideal composition right away. “No one can create great night images without experimenting and learning by trial and error!” says Grant.
2. Gain a solid understanding of lunar & planetary motions.
We can’t harp on this one enough – good, let alone great night photographers have a solid understanding of what the moon and stars are up to at any given time during the year. “Thorough knowledge of moon phase and rise/set times prior to going out shooting is crucial to achieving whatever kind of night shot you want to create,” Grant advises.
“Some images require a rising or setting moon, some a new moon, and some a full moon,” says Grant. “For example, shooting the bright center of our Milky Way galaxy requires dark skies and little-to-no moonlight to really bring out the colors in the ‘dust lanes’ of the galactic center. What’s more, there are only certain times of the year that the middle of the galaxy presents itself high enough above the horizon to shoot it in the dark part of the night.”
To get those stellar star trail shots, night photographers know that it’s all about the rotation of the earth. “A camera fixed on a tripod is actually moving along with everything else on the planet,” explains Grant. “So, if you start a long bulb exposure at night in the northern hemisphere facing in a northerly direction, the stars in the sky will appear as trails in concentric rings around the north star as result of the earth rotating on its north-south axis.”

Photo by Grant Kaye/Middle Velma Lake, Desolation Wilderness, Lake Tahoe, CA – star trails stack with a set of images for stars and one exposure for foreground,at full moon.
Because stars appear the brightest when there is a new moon or the moon has yet to rise, photographers must make a tradeoff: no moonlight might mean better star trails, but you won’t get much illumination on the landscape. Grant suggests photographers pre-visualize how they want the image to come out, and marry that with their understanding of the lunar and planetary motions.
Grant says you have to ask yourself, “Are you shooting stars, or a moonlit landscape? Do you want star points, or trails? Is the moon up? If so what phase is it, and when does it rise and set? How much light pollution is around in the direction you are facing? Each one of those things requires a different strategy.” Proper planning means a better chance of getting the image that you want.
3. Invest in gear with low light capabilities.
Photographers frequently ask Grant if they need to spend boatloads of money on gear to produce images like his. “The answer is mostly no,” says Grant. “All you really need to take photographs at night is a camera with manual mode, film or a memory card, and a tripod.”
Personally, Grant is a Canon shooter and currently uses his trusty 5D Mark II, though he recently purchased a Mark III and has been “blown away by the low-light capability.”
“In the last five years, shooting at night with digital cameras has improved one thousand-fold if not more,” says Grant. “Full-frame, low-noise sensors in cameras with fast RAW processing hardware and speedy storage cards have brought us into a new era of night photography.”
In addition to the Mark II/III, Grant also suggests the Nikon D3s and D800. When it comes to lenses, his go-to is the Canon 16-35mm f/2.8 lens. This gives him the possibility to shoot quality images in low light.
“The use of a wider-aperture prime lens will allow you to let in more light and bring down noise levels,” says Grant. “The Canon 24mm f/1.4 is excellent, but if this is out of your price range, consider getting the ‘nifty 50’ Canon 50mm f/1.8 for around $100. You’ll be shocked at what a difference there is in your night photography between f/2.8 and f/1.8.”

Photo by Grant Kaye/Mono Lake, CA – star trails and long exposure at new moon.
Beyond the body and lens, there are several pieces of equipment that Grant says can help improve the quality of the images you create:
- Cable release
- Intervalometer for creating time-lapse
- Motion control system (for adding an element of foreground motion to time-lapses)
- Sturdy tripod for wind resistance
- Headlamp with a red LED
- Flashlight for light painting
- Photoshop or Lightroom for noise removal, frame stacking, dodging and burning, etc.
While the above gear isn’t technically necessary, serious professionals should look into investing in a few of these to further improve their night photography.
4. Fall in love with high ISO.
“There really is no catch-all recipe for camera settings and night photography,” admits Grant. “You really have to go back to pre-visualizing what kind of image you want to create, based on what landscape and astronomical features you hope to bring together.”
Still, the general rule for night photography is to use the lowest ISO possible and the widest aperture available. “Digital SLR sensors will start to suffer from high noise at higher ISO values,” says Grant, “and also when performing long exposure at lower values.”
“To throw any potential night shooters a bone… for the most part, you will be shooting at or above ISO 800, below f/6.7, and exposing for at least 10 seconds. Start there, make a guess, check your histogram and LCD screen (don’t bother with the light meter), and give it a try!”

Photo by Grant Kaye/Alabama Hills, Lone Pine, CA – short exposure, wide aperture, high ISO, just before moonrise.
Since star trail images are made with either long exposures or stacking multiple short exposures, noise can be a big issue. And that’s where your post-production skills come in.
5. Master post-production.
The truth is that no matter how high the ISO or how wide your fancy lens can go, it’s pretty difficult to get a totally clean night shot. So Grant suggests creating a “dark frame” and subtracting the noise from your photo.
“Let’s say you want to shoot a long, 15 minute exposure to make a star trails image, and there is a half moon,” says Grant. “You might be at f/2.8, ISO 400. After you make your 15-minute exposure, put the lens cap on, cover your viewfinder with your hat, and then make another 15-minute exposure, or ‘dark frame.’ Then take this image into Photoshop or Lightroom as a layer above your star trails image and change the blending mode of the dark frame to ‘difference.’” This post-production technique removes the noise and gives a cleaner final image.

Photo by Grant Kaye/Racetrack Playa, Death Valley National Park, CA – long exposure of star trails at new moon with dark frame subtraction.
Another method is to stack multiple images shot with as short of an interval that you camera/card combo can handle. “One second is ideal,” says Grant, “and then you can fire off a sequence of a few hundred shots. Others may want to do less post-processing, and they should shoot 3-5 minute exposures with a very short 1-5 second interval between frames, and then stack these.”

Photo by Grant Kaye/Alabama Hills, CA – stack of 279 exposures from a timelapse.
“With either technique,” says Grant, “dark frame subtraction is essential to mitigate noise as a last processing step.”
6. Find the “infinity point”.
Focusing and composing – they’re some of the most basic photographic techniques; but things get tricky when there’s no light to guide you. So instead, night photographers must find the “infinity point” on their lenses.
“I typically start out by temporarily setting my camera to the highest ISO it is capable of,” says Grant. “I then switch the camera into Bulb mode, adjust the focus to approximately where I think the infinity point is, and hold down the shutter with my finger for 2-6 seconds. The resulting image isn’t useable due to extremely high levels of ugly pattern noise, but it will tell you what is in your composition, and whether or not your focus is at the right point by whether the stars are crisp dots or fuzzy.”
From there, you can make small adjustments to your focus until you get it right, and then switch back to usable ISOs. It’s a departure from the “normal” routine, but then again, so is much of night photography.

Photo by Grant Kaye/Bribie Island, Brisbane, Australia – short exposure, just at break of dawn with heavy light pollution and rare astronomical phenomenon.
Additional resources
Want more tips to build an outdoor & adventure photography business? Be sure to check out our guide Building Your Outdoor and Adventure Photography Business with more tips from pros to market your work, master storytelling, develop a solid workflow and attract the clients you want.
Learn something from this post? Share the knowledge and hit the “Tweet”, “Like”, “Share”, “Pin it”, or “Plus” button below.
Are you a professional photographer? Check out PhotoShelter — we make killer photography websites and offer over 100+ professional grade tools to help you showcase, store, share, and sell your images.
Previous Post: Unboxing The New York Times Magazine’s “Photographs”
You May Also Like
-

Expert Advice and Top Tips from Pro Photographers for 2024
What’s one piece of advice you would give to aspiring or up-and-coming photographers? We asked nine experienced photographers and PhotoShelter members to share their top tips for those looking to get ahead in their photography careers. From finding your own visual voice to working with a mentor or photo assistant, each piece of advice listed […]
-

What’s On Your Photography Holiday Wish List?
The holiday season is around the corner and that means it’s the perfect opportunity to upgrade your gear or find that special gift for the visual storyteller or photography enthusiast in your life. We reached out to a handful of renowned photographers and PhotoShelter members, each with their unique styles and preferences, to bring you […]
-

Share a Photo That Means the World to You
We all have a photo that means the world to us. Maybe it’s one we made ourselves – the first photo from our first camera. It could be an old family photo in a beloved photo album. Or maybe it’s an iconic image that hangs on our wall at home. With World Photography Day coming […]