Share
Why Facebook Photos Look so Bad, and the DIY Solution to Fix It
With the largest public repository of photos on the Web, it’s not surprising that Facebook has and continues to employ heavy compression to all o...
With the largest public repository of photos on the Web, it’s not surprising that Facebook has and continues to employ heavy compression to all of the 250 billion images they store. Facebook never intended to be a high quality archiving service of photos, but rather, photos act as social glue for the social media giant.
But seriously, why do your photos look so bad?
File compression up to 90%
JPG, the dominant photo file format, uses a form of “lossy” compression, which means it throws out picture data to reduce the file size. If you’ve ever played with the “Quality” slider in Photoshop, you probably understand the trade-off in file size and image fidelity.

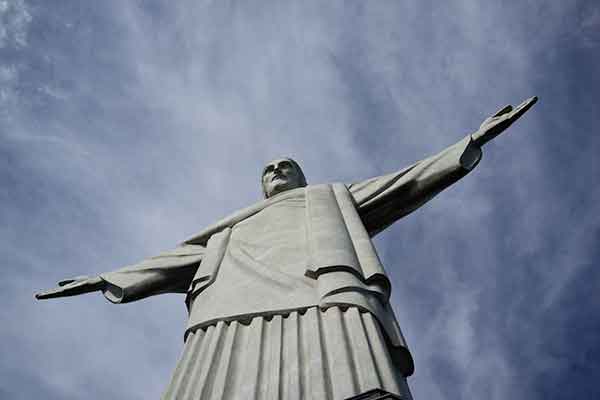
Photo by Allen Murabayashi. Quality = 10. Notice the blockiness around the arms.
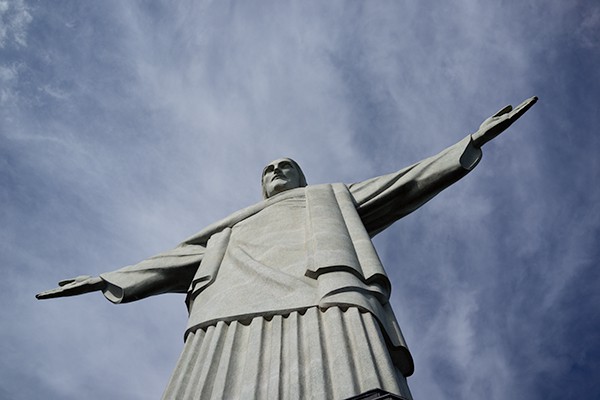
Photo by Allen Murabayashi. Quality = 100
“Blocky” looking sections of a photo particularly around edge detail or gradients in color are the telltale signs of JPG compression.
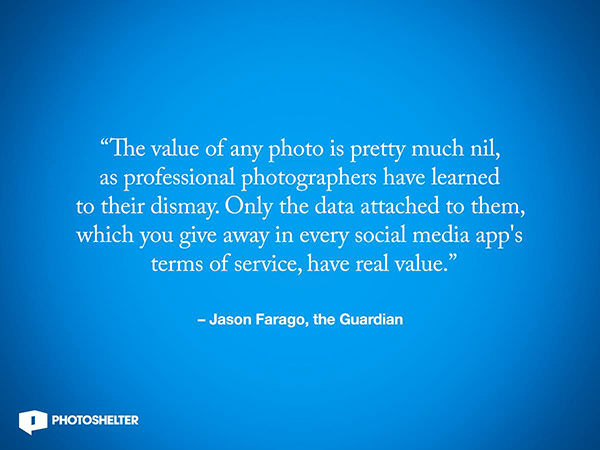
The compression is particularly noticeable when a graphic has hard edges like this white type against a graded background.
When you save a JPG, then resave a JPG (as is the case when Facebook converts your image on their servers), these compression artifacts become all the more pronounced.
So what’s the solution? There are a few ways to optimize your images:
Upload 2048px images.
This is the maximum width that Facebook will display. Assuming you’re unconcerned about people downloading your images, the larger image will suffer less compression artifacts.
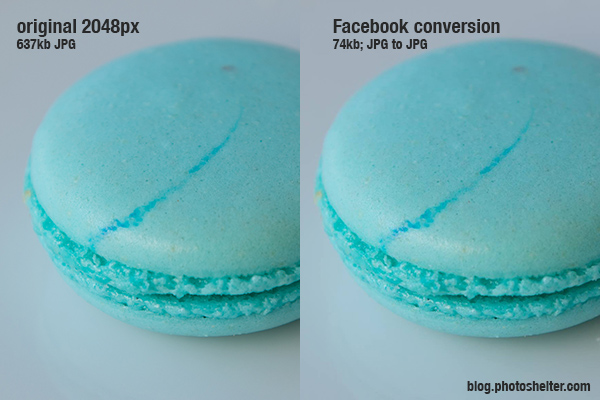
In this first example, there isn’t much difference between the two images despite the fact that the second image has been compressed to nearly 1/10th the original file size.
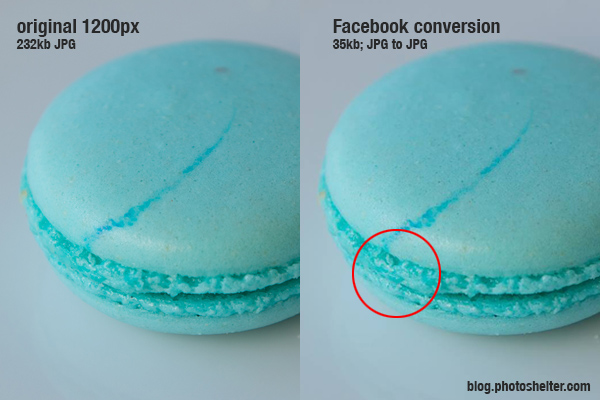
In the second example where the source image started as a 1200px image, the compression is much more pronounced in the macaron filling (highlighted by the red circle), even though on a percentage basis, the compression is less. In general, all the fine detail has a grittier texture because the Facebook sharpening algorithm is a bit aggressive when the source image is smaller.
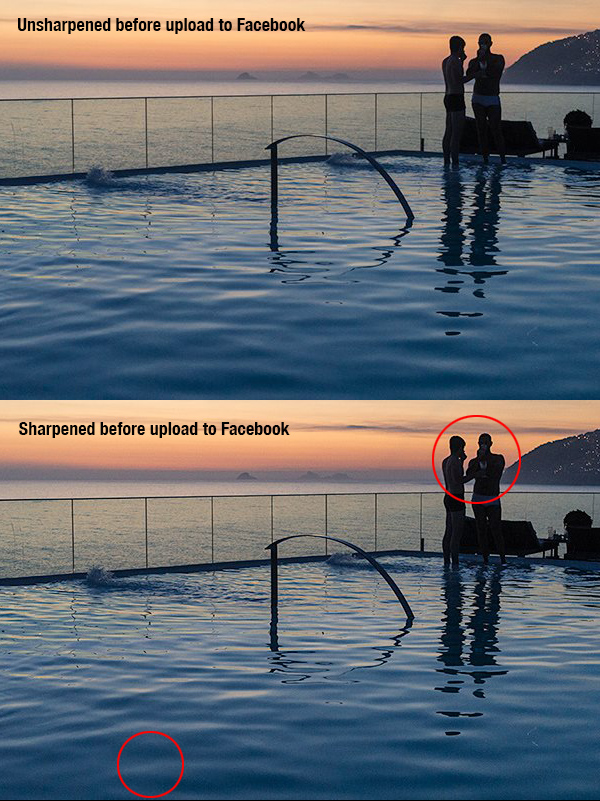
Don’t add sharpening to your photos
Sharpening is a matter of taste, but double sharpening is never good. Like most online photo services (including PhotoShelter), when an image is processed by Facebook, the image conversion algorithm adds a little bit of sharpening. This is intended to help the images “pop” a little more. But if you’ve sharpened prior to upload, the image is going to be oversharpened, which can accentuate the compression artifact. If you’re shooting at high ISO, the “grain” will also suffer from the oversharpening.
Save your images in the PNG format instead of JPG.
PNG is a lossless format, and images converted by Facebook suffer less compression. This is particularly true when you have lots of edge detail as in the quotation graphic above, or uploading a photo with smaller dimensions. Strangely, Facebook will sometimes maintain the PNG format,while other times it will resave as a JPG. In this example, I started with a 6000×4000 RAW file, and converted it to a 600px JPG and PNG. Each image was uploaded to Facebook and then downloaded for analysis.

Photo by Allen Murabayashi
As you can see, the edge detail and fine detail in the face and hair exhibit pretty drastic compression in the JPG file. But the PNG file looks surprisingly good, while strangely increasing in file size. The uploaded PNG was downloaded as a PNG, so Facebook maintained the file format at this size.
Bottom Line
The easiest and most obvious benefit is derived by uploading PNGs at any size. The PNG files will inevitably be larger than JPGs, so if you have a slow upload connection, you’ll be waiting a little longer. But if you care about how your images look, it’s worth the wait.
Ready to learn how to use Facebook to its fullest existent for your photo business? Download one of our newest guides The Photographer’s Guide to Facebook.

Learn something from this post? Share the knowledge and hit the “Tweet”, “Like”, “Share”, “Pin it”, or “Plus” button below.
Are you a professional photographer? Check out PhotoShelter — we make killer photography websites and offer over 100+ professional grade tools to help you showcase, store, share, and sell your images.
You May Also Like
-

Expert Advice and Top Tips from Pro Photographers for 2024
What’s one piece of advice you would give to aspiring or up-and-coming photographers? We asked nine experienced photographers and PhotoShelter members to share their top tips for those looking to get ahead in their photography careers. From finding your own visual voice to working with a mentor or photo assistant, each piece of advice listed […]
-

What’s On Your Photography Holiday Wish List?
The holiday season is around the corner and that means it’s the perfect opportunity to upgrade your gear or find that special gift for the visual storyteller or photography enthusiast in your life. We reached out to a handful of renowned photographers and PhotoShelter members, each with their unique styles and preferences, to bring you […]
-

Share a Photo That Means the World to You
We all have a photo that means the world to us. Maybe it’s one we made ourselves – the first photo from our first camera. It could be an old family photo in a beloved photo album. Or maybe it’s an iconic image that hangs on our wall at home. With World Photography Day coming […]