Share
Production Values: How to Shoot Commercial Quality Images
photo by John Ragel1. OVERVIEWOne of the keys to creating great commercial photography is achieving high production value. A photographer not accus...
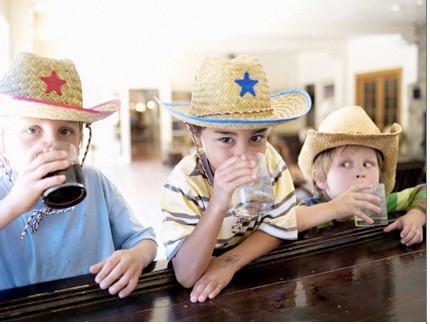

photo by John Ragel
1. OVERVIEW
One of the keys to creating great commercial photography is achieving high production value.
A photographer not accustomed to shooting stock might spend a month shooting family and friends and expect the resulting images to fly off the shelves. In some cases, this could lead to sales– if your friends are near-models and totally hip, or if your family picnics look like Martha Stewart’s.
But for most of us, the life we lead will not have polished enough details for buyers. Buyers notice EVERYTHING – hair, makeup, fingernails, skin quality, details on furniture or walls, floors, food– and the slightest hint of grime or poor styling could disqualify your image from use. This is why most stock photographers set up fake situations to look real.
We hope this article will help bring commercial-quality production value to your work so that your images truly will fly off the shelves.
2. DEFINITIONS
‘Production Value’ mainly refer to:
- Casting
- Styling (wardrobe, hair, makeup, props, food)
- Location
- Lighting (See the ‘Lighting – Lifestyle’ article under ‘Tools of the Trade’)
- Framing + other aspects of shooting – angles, crops, etc.
3. INTRODUCTIONS
Every single photographer and buyer we spoke to referenced production values in some way – and most of them had similar input. We asked two of our favorite production experts to sum it all up for us. We are so grateful to them for their help!
- Cameron Cooper – Stylist
- Annie Etheridge – Photographer, Photo Editor, Producer
4. CASTING
Casting is square one. If you don’t get
this right, the rest of your shoot is doomed. But get it right – and
you give yourself a huge margin for error in many other areas. Here are Cameron + Annie’s top tips.
- Don’t cast posers. The best models – whether actual models or real people – can
inhabit a storyline and play in front of the camera without being
self-conscious and without posing. Actors can often be a good source of
models for this reason.
- Do test shots. For any model you are
considering, have them do something, such as pretend to set a table,
clean a counter, or eat something– and take test shots. See how relaxed
and un-posed they can be. And how do they look on camera?
- Attractive
but REAL. You want to find models who are attractive and pleasing to
the eye, but who look real. You do not want someone who looks like a
fashion model. Models cannot be too soap-opera good looking, and they
cannot have a personal style that will date your image or make it look
‘cheesy.’ Big red flags include people who are overly-tan, wear a lot
of makeup, have overdone hair, show you a fashion portfolio, are
overly-buff and muscular, or otherwise have made-up appearances
that prevent an everyday person from relating to them.
- Charisma.
You need people with palpable personal energy that can translate to your images.
Do the test shots. Talk to them. Are they fun? Will they bring positive
energy to your shoot?
HERE ARE SOME EXAMPLES OF POOR CASTING:

HERE ARE SOME EXAMPLES OF GREAT CASTING:

photos (l-r): Thayer Gowdy, Andrea Wyner, and John Ragel
Editor’s Note:
Stock
photography is not fashion photography. Choose models that are
comfortable and natural in front of the camera, avoid models that pose
too much or give “sexy looks”. Trendy hairstyles and facial hair will
date your images quickly. Choose models that have a more classic look.
photography is not fashion photography. Choose models that are
comfortable and natural in front of the camera, avoid models that pose
too much or give “sexy looks”. Trendy hairstyles and facial hair will
date your images quickly. Choose models that have a more classic look.
5. STYLING YOUR MODELS
Personal styling primarily includes wardrobe, makeup and hair. You can
hire a stylist or brave it alone. If you are doing your own styling,
spend some time educating yourself by looking through magazines or your
intended target outlet for your images. Notice down to the smallest
details how the models are
styled.
- Know your character + storyline. As Cameron
says, if you’re shooting a mom, is she urban and in her 30’s, a
working mom in her 40’s, or younger and more traditional? Your styling would be completely different in all three cases. Annie
similarly points out, if you are showing a woman having morning coffee, don’t do
her hair like she is going to a wedding. This seems obvious – but do
some searches for women having coffee and you will see at least a few
pictures making this exact mistake.
- Get a timeless look. The
rule of thumb is to use clothing that will last (i.e., not look dated)
for 5 years. To walk the fine line between looking modern (good) and
looking trendy (bad), Cameron recommends to be aware of trends but not
be literal to them. If kids are wearing denim and hoodies now, that’s
probably also what they’ll be wearing in 5 years, but the details and colors
will be different. So don’t pick out a bright psychedelic hoodie –
take what’s going on now, step back, and make it more understated.
- Classic
simple clothing is safe. If you don’t have a strong sense of how to
style, stick with J. Crew, Banana Republic or the Gap. Pick neutral
colors and simple styles. Nice jeans on a man, or Capri pants or a
simple dress for a woman.
- No patterns. Patterns kill your image. No florals.
- No black or white. In most cases stay away from strictly black or white clothing too. It doesn’t photograph so well.
- Fresh
and ironed. Clothing should look fairly new but not crisp and just off the rack.
Bring an iron or a steamer to the shoot. Everything should look clean
and fresh out of the wash. No wrinkles.
- Accessories? Stay
away from them! Unless they are basics – little hoop earrings for women
or a wedding ring – then lose the accessories. No dangling earrings on women. No jewelry at all on men.
Unless you are specifically shooting something formal (i.e., New Year’s
Eve) then stay very simple.
- Belts,
Glasses, Watches? Also stay very simple. Buyers typically want things
to look a little high-end, so if you have everyday items that are going
to be seen, make sure they don’t stick out and that they are of a good
basic quality. Look out for weird or large belt buckles or
over-stylized glasses. If a watch sticks out, take it off.
- Manicures
+ Pedicures! Make sure the cast members have clean hands and well kept
fingernails and skin. No long fingernails. No nail polish except for
clear. No dry skin. No French manicures. Keep the nails short and
clean.
- Hair? The styling of hair on-set is really important.
Always bring a hairbrush to a shoot. And again, stay simple. No trendy
haircuts unless that is your specific subject matter. For dyed hair you
don’t want to see bad dye jobs and you don’t want to see roots. No
over-bleached or fried hair, nothing too permed. Hair and skin both
need to look healthy. On the shoot, make someone responsible for
keeping strands out of the models’ faces. Long hair can be worn back or
down. Just make sure the style is appropriate to the story you are
telling. You generally don’t want hair to be over-styled – it should not look fashion-y.
- Bring multiple outfits. Test shoot different colors
and styles if possible to see what works on camera and with your
model’s body.
- Wardrobe on a budget? Cameron recommends H&M,
Macy’s, Banana Republic, Urban Outfitters and similar stores that have
good basics and more liberal return policies. Yes, This is what
stylists do– they buy clothes from stores and then return anything
that is in sufficient condition to be ethically returned after the
shoot. Sometimes they will keep key pieces to have as part of their
styling wardrobe. Stylists also have borrowing arrangements with stores and
designers but this likely will not be an option for many photographers
working without stylists. For blue jeans and other basics, thrift
stores can also be great sources. You might even find some good stuff
in the model’s own wardrobe, so start there.
HERE ARE SOME EXAMPLES OF POOR STYLING:

HERE ARE SOME EXAMPLES OF GREAT STYLING:

photos by Thayer Gowdy
Editor’s Note:
Again,
stock is not fashion! Never dress your models like they’re going for a
strut down the catwalk. When styling your subjects avoid busy patterns
and over accessorizing. Jewelry tends to overpower the look, and can
get dated fast. Never dress all your models in the same color. Stick to
simple, varied lighter colored classic clothing that all works together
as an ensemble.
6. PROP STYLING
Making sure the environment is appropriately styled is also critical. Here are some things to keep in mind. And again, the best way to train your eye is to read magazines constantly and pay attention to the nuances of prop styling.
- Prop styling a shoot is like staging a house to sell it. This is the best general rule of thumb we can offer. On a funded shoot, truckloads of furniture are brought to locations and the prop stylist re-props the entire house. They remove the owner’s furniture and re-prop so that the house is clean and uncluttered and well-designed. It needs to look live-able and lived-in, but not messy and not personally specific. Scan the room and if you see any mess or anything ugly to the eye, anything cluttered or unnecessary to the story – get rid of it.
- Remove all personal items. No family pictures, souvenirs or kids toys – remove all of these items from the shot.
- Tell the story. Just as with styling a model, know the scene you are setting, and set it accurately. A family in a living room after dinner doing homework requires different props and styling than a family in a living room in the morning getting ready for school. Make sure you have props to indicate the story and make sure they are the right props. A lot of images are shot in too sparse a setting.
- Green lawns. If you are outside, the lawn should be green, the plants healthy, no grimy or dirty areas.
- New appliances. If any of your props involve appliances (kitchen or bathroom) or technology – make sure everything is new, clean, and modern.
- Modern furniture. Use up to date furniture, not overly-used, and clean.
- Table settings matter. If you are shooting a table, pay attention to everything: the dishes, the silverware, the salt and pepper shakers, the candles. You don’t want to see an old grungy melted candle, but it also shouldn’t be brand new.
- No lace! Don’t use lace to style a table or any other aspect of a home.
- Think graphically. Design your environment in terms of color blocks and composition. For a picnic, use a graphic red and white tablecloth with white plates and white napkins and that’s it. Don’t go wild – think graphic, clean, simple.
- Props on a budget? Prop stylists are the same as wardrobe stylists – they have arrangements with stores, and when desperate, buy items and return them. If you want to buy props, stay mainstream. Think Pottery Barn and Ikea.
HERE ARE SOME EXAMPLES OF POOR PROP STYLING:

HERE ARE SOME EXAMPLES OF GREAT PROP STYLING:

photos by Augustus Butera, Andy Caulfield and Susan Pittard
Editor’s Note:
When propping a set, try to create an environment that looks real, but
not sloppy or overdone. Keep it simple, but not too sparse or under
propped. Propping is a fine line and much thought should go into
this when setting up a shoot. The idea is that the environment appears
like that of a real home, patio, bedroom, picnic table, etc. Pay close attention to the details and placement of props in the frame
7. FOOD STYLING
Again, scour magazines and see what standards and fashions exist in food styling. If you don’t quite get it and want to shoot food, you should hire a food stylist to at least show you some basics.
- Food always needs to be styled. The food should look beautiful, edible, and delicious – and this usually takes knowledgeable cooking and preparation, good selection of colors and produce, clean and picturesque arrangement on a plate, spraying or misting during the shoot to keep everything fresh looking– total attention to detail.
- Don’t just buy a platter from the Italian restaurant. You can always tell if a photographer just bought something from the local restaurant – that never works. The style of the tomato or lettuce give it away! The food needs to look homemade and have that loose feeling, but still be beautiful.
- Don’t over style. Again, don’t put lace and gems on the table. You are not feeding the Royal Family! Keep your food classic and simple.
HERE ARE SOME EXAMPLES OF POOR FOOD STYLING:

HERE ARE SOME EXAMPLES OF GREAT FOOD STYLING:

photos by Quentin Bacon, Marie-Louise Avery, and Ryan Benyi
Editor’s Note:
Food should always look freshly prepared and delicious! Simple and
clean styling is better when it comes to most food. Avoid the over use
of garnishes and elaborate plating. It is a good idea to reference
food magazines for ideas.
8. PICK A GOOD LOCATION
Location scouting is a must. This is a critical part of pre-production,
and depending on the scale of your shoot, can require a significant
amount of time and thought. Here are some basics to consider.
- Good
light. Visit your location at various times of the day and know the
light – know the right hours to shoot. Which way does the light face
and what are its qualities? Take test shots. Typically you don’t want
to shoot outside from 11.30-3.30 unless you are in the shade or have
silks to diffuse the brightness.
- Lots of room. You should be
looking for a location where you have room to shoot. Don’t box yourself
into a space where you can’t move around. Make sure there is plenty of
room for any of your team members, places for models to change, and a
kitchen if you need to prepare food.
- Get permits. If you are
shooting in a public space you will likely need a permit – this is
especially true for parks, beaches and in some cases city streets.
Permits are typically easy to get but sometimes you need a couple of weeks
to line them up – so think about it in advance. Also, you can often pull
off shoots without permits if you are keeping things casual. If you
have a crew, any kind of lighting equipment, and if you are using a
tripod – you will probably need a permit – your shoot could get shut
down if you don’t have one.
- Consider insurance. Some
locations or permits will actually require you to have insurance –
usually $1M of insurance that covers your crew, damage to a location –
floors, etc. Again, if you are shooting casually this is probably a step
you will skip.
- Location fees. Many private locations will
charge you a fee to shoot there. Occasionally parks and other public
spaces might also charge a fee. Learn about this as part of your
scouting efforts. Many photographers refuse to pay location fees and just won’t use locations that charge them. It’s up to you!
HERE ARE SOME EXAMPLES OF POOR LOCATIONS:

HERE ARE SOME EXAMPLES OF GREAT LOCATIONS:
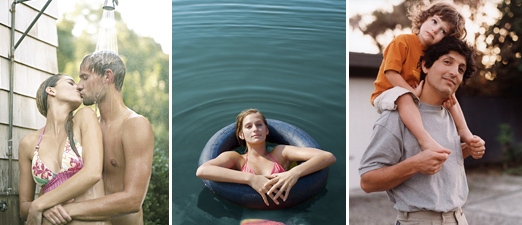
photos (l-r): Thayer Gowdy, John Ragel and Thayer Gowdy
Editor’s Note:
Avoid busy locations without a background to place your model. When shooting indoors, it is imperative that the surroundings are free
of clutter. The viewer’s eye should focus on what is happening with your
model, not the clumsy furniture in the background. Choose locations
that are open and airy and give you several set up options. Pay
attention to the quality of light in each location and plan accordingly
when deciding on your lighting set up. The location should look real
and lived-in, but not cluttered.
9. FRAMING + SHOOTING STYLE
The angles and style of your shooting also contribute to the commercial viability of your image. There is obviously room for a massive range of styles – and this
entire topic is subjective. But even at the risk of incurring debate
and ire, we respectfully offer some basic guidelines here.
- Move
around. One of the biggest mistakes in stock photography is that
photographers stand back and don’t physically connect with their subjects. You
are trying to capture un-moments and real expressions. You can’t do this
standing still! The reason most lifestyle photography is shot
with natural lighting is because it’s too hard to move around
elaborate lighting set ups. Set up your situation, make the models
really do the action and go through the scenarios, and move in and out
of the situation as the photographer. Make your models really laugh, and
capture those moments instead of doing something stationary and stiff.
Lifestyle photography is supposed to feel loose and real – that’s the
whole point.
- Don’t go too wide on framing. Going too wide can
distort a little bit. Don’t be afraid to move in close on your subject.
- Shooting straight on? Not so much! You
want your pictures to look like you’re not there – like you’re
witnessing something that is real and you are a fly on the wall. So
don’t shoot straight on so much – that can really look staged.
HERE ARE SOME EXAMPLES OF POOR FRAMING:

HERE ARE SOME EXAMPLES OF GREAT FRAMING:

photos (l-r): Inti St. Clair, and Emily Nathan for Apple
Editor’s Note:
Keep in mind the feeling of intimacy in most lifestyle photography, that the
viewer should feel like they’re part of the moment (and want to be!). Don’t be afraid to get right in the action. But remember to leave some
space in your images. Art directors like to have areas that aren’t too
busy to lay down their copy. It is important for the imagery to feel
loose and not posed or set up even though it may be. All the elements
need to come together to create a real moment.
10. PARTICIPATE
Are you a buyer or photographer with extensive experience relevant to this category? We’d love to hear from you! Please email us with any additions to the Shotlist, Tips, or any other sections of this article. We look forward to it!
Next Post: Model and Property Releases
Previous Post: Cyclical Needs in Stock Photography
You May Also Like
-

Expert Advice and Top Tips from Pro Photographers for 2024
What’s one piece of advice you would give to aspiring or up-and-coming photographers? We asked nine experienced photographers and PhotoShelter members to share their top tips for those looking to get ahead in their photography careers. From finding your own visual voice to working with a mentor or photo assistant, each piece of advice listed […]
-

What’s On Your Photography Holiday Wish List?
The holiday season is around the corner and that means it’s the perfect opportunity to upgrade your gear or find that special gift for the visual storyteller or photography enthusiast in your life. We reached out to a handful of renowned photographers and PhotoShelter members, each with their unique styles and preferences, to bring you […]
-

Share a Photo That Means the World to You
We all have a photo that means the world to us. Maybe it’s one we made ourselves – the first photo from our first camera. It could be an old family photo in a beloved photo album. Or maybe it’s an iconic image that hangs on our wall at home. With World Photography Day coming […]