Share
Can You Believe These Are iPhone Images?
Best iPhone photo app ever? CameraBag. Hands down, no question, I can’t get enough of it. Seriously, it might even start causing problems in my r...
 Best iPhone photo app ever? CameraBag. Hands down, no question, I can’t get enough of it. Seriously, it might even start causing problems in my relationship because of my new obsession with the camera in my iPhone.
Let’s face it, the iPhone camera itself isn’t very impressive. It shoots the kind of pictures you’d expect for something that has a lens the size of the head of a pin, and fits in your pocket.
CameraBag, an app that cost me a whole $2.99, changes all that. It’s a super handy set of software “filters” that makes the image take on the effect of some other camera, or some other time.
Helga, Mono, Fisheye, Lolo, 1974, 1962, Instant, Infrared, and Cinema are the currently available choices, and each places a distinctly different look on a picture – breathing new life into the capabilities of the iPhone camera.
Once I got my hands on this sweet app, I started running around looking at everything in a different way – because now everything is a potential photograph, and I always have a camera in my pocket, waiting.
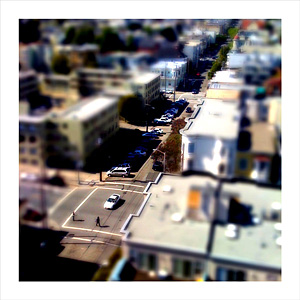 Then, to make a good thing even better, I installed another app, “TiltShift“, that allows you to, well, make it look like it was shot by Vince Laforet. OK, not exactly, but it allows you to selectively blur portions of the image, which gives you the ability to add some depth and perspective to the image.
The iPhone camera is designed to be simple, so everything is always in focus. TiltShift lets me make a background go completely out of focus, similar to what you would normally do with the lens on a 35mm camera.
So, my iPhone “workflow” is as follows:
1) See something that needs to be shot.
2) Stop dead in your tracks and pull out the iPhone and get into shooting position. (It’s like seeing a parking spot in the city – all traffic laws are temporarily suspended while you rush to claim the much-coveted space. Want to do an illegal u-turn in the middle of a crowded crosswalk? Don’t worry. If you’re racing to claim that parking spot, everyone will understand.)
3) Shoot your picture with the iPhone camera. Chimp. Shoot again, if needed. Chimp again. Repeat as needed. Don’t worry, everyone will understand.
 4) If you feel this particular image could benefit from TiltShift, open it up and get through their annoying interface. (They force you to have to look at their sample images every time you load one of your own images. Annoying, but oh well.) Select the image you just shot from your Camera Roll library and do the whole selective focus thing. Then save the image. (It saves a new copy to your Camera Roll library.)
5) Then open up CameraBag and prepare yourself to be overly excited. Choose the effect you want (I always use “Lolo”) and if you like how the preview looks, save it – a new version will be added to your Camera Roll library.
6) Go to step 1.
I find that the limitations of the iPhone camera actually add to the creative process because I don’t have to obsess about every little detail in the image like I would with my high-end DSLR. I can’t take this too seriously, so it’s always fun, and I think the fun shows through.
Feels like creative freedom, and it’s addictive.
See all of them in my iPhone Images Gallery
Next Post: COME MEET YOUR PHOTOSHELTER FRIENDS
Previous Post: May Featured Photographers
You May Also Like
-

Expert Advice and Top Tips from Pro Photographers for 2024
What’s one piece of advice you would give to aspiring or up-and-coming photographers? We asked nine experienced photographers and PhotoShelter members to share their top tips for those looking to get ahead in their photography careers. From finding your own visual voice to working with a mentor or photo assistant, each piece of advice listed […]
-

What’s On Your Photography Holiday Wish List?
The holiday season is around the corner and that means it’s the perfect opportunity to upgrade your gear or find that special gift for the visual storyteller or photography enthusiast in your life. We reached out to a handful of renowned photographers and PhotoShelter members, each with their unique styles and preferences, to bring you […]
-

Share a Photo That Means the World to You
We all have a photo that means the world to us. Maybe it’s one we made ourselves – the first photo from our first camera. It could be an old family photo in a beloved photo album. Or maybe it’s an iconic image that hangs on our wall at home. With World Photography Day coming […]