Share
6 Alternative Camera Bag Tips for Travel Photographers
Greenland landscape, 2006 (Winner Travel Photographer of The year, Portfolio 2010) Quintin Lake is an architectural and fine art photographer bas...

Greenland landscape, 2006 (Winner Travel Photographer of The year, Portfolio 2010)
Quintin Lake is an architectural and fine art photographer based in the UK. In between commercial assignments, he often sets out on photographic expeditions to remote or lesser known locations, including the Arctic, Southeast Asia, and South America. Years of travel have taught him a thing or two about camera bags.
In this guest blog post, Quintin shares his best tips straight from the field.
For many travel photographers, choosing how to carry your gear is harder than choosing your camera system. Because while camera systems can be relatively flexible, no one bag is waterproof, lightweight, carry-on compliant, and can carry a week of food plus other gear.
The following tips are from trial-and-error in travels to over 70 countries. They’re aimed at photographers who prefer to work alone, walk, use public transport, travel as cheaply as possible, and don’t have an army of assistants.
Tip 1: Don’t carry it
If you don’t need a bag, or an extra lens, don’t take it. Just don’t. This may limit you technically, on occasion, but in most situations you’ll compensate for it with your increased creative energy and focus. Galen Rowell, an inspiring gear minimalist, said: “Only where vehicles, pack animals, porters, or assistants can carry my gear do I ever consider taking all of it. Otherwise, you’ll find me as I started out in the sixties – carrying one simple camera or none at all. That’s how I continue to make many of my all-time favorite pictures.”
Tip 2: Use a sling
Why use a sling? They don’t get in the way, they’re more comfortable to carry all day, they don’t make you look as much like a tourist, and they let you to be discreet, should you wish, by covering much of the camera with your arm.
Tip 3: Don’t buy a travel camera bag
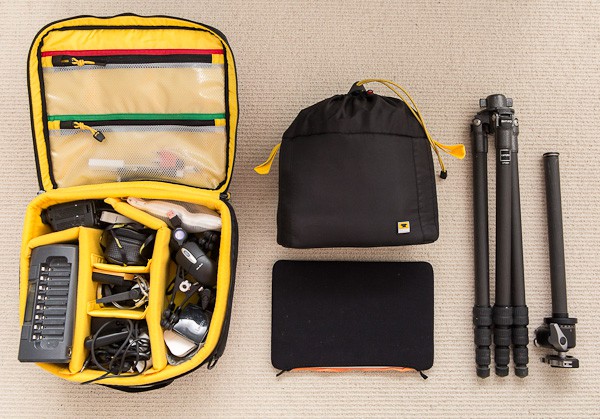
Instead of buying a bag dedicated for camera travel, I suggest using padded camera inserts (such as Mountainsmith’s Kit Cube). Place these in regular backpacks, shoulder packs, and wheeled luggage. It’s more flexible, but more importantly, much lighter.

Left: Mountainsmith kit cube packed with durable equipment in image above. Center top: Mountainsmith traveller packed with 4 lenses and camera body shown above. Center Bottom: Macbook air 11″ in neoprene sleeve. Center right: Gitzo tripod with Really Right Stuff ball head.
Camping and trekking backpacks are far more comfortable, offer more space, and are a better value than most camera bags. If you prefer wheeled luggage, use your existing roll-on, or buy one to fit your existing photo bags or inserts. Wheeled camera bags completely miss the mark by being crazy expensive, extra pounds, and no space for clothes or other travel necessities.
Tip 4: Choose your tripod length carefully
Your tripod, with the head removed, should be less than 45cm (~18 inches) so you can take in your carry-on luggage. If you’re worried about stabilization with a small or lighter tripod, you can hang weight from the center column. Even the very light models from the premium brands work great using this technique.
Tip 5: Fly with adventure racing backpacks
With carry-on weight limits for some airlines as low as 8KG (~18 lbs.), it’s always a challenge to fit your camera, lenses, and laptop in one bag. Adventure racing backpacks are designed for mountain runners – those by Terra Nova weigh around 300g (~2/3 lb.) or less and a padded insert will be around 250g (1/2 lb.) so you can make it under the weight limit.

Quintin Lake with CCS camera holster and mountaineering gear, Greenland, 2006
Tip 6: Check-in your less fragile gear
If I need a lot of gear, I’ll check-in a bag with my tripod, clamps, strobes, and non-essential chargers, along with my clothes. Wherever possible I’ll only travel with a carry-on that’s under 8KG (~18 lbs.).

Left: Lowe Alpine TT Roll-On 40 containing Mountainsmith Kit Cube, disassembled gitzo and clothes (checked in, 14KG). Right: Terra Nova Laser 20 containing Mountainsmith Traveller & Macbook Air 11″ (carry-on 7.9KG)
Quintin also put together four “case studies” from his travels to show how he managed to still travel light, even in the wildest of conditions. Check what he learned and his major travel takeaways here.
Next Post: By Reading This, I Now Own You
You May Also Like
-

Expert Advice and Top Tips from Pro Photographers for 2024
What’s one piece of advice you would give to aspiring or up-and-coming photographers? We asked nine experienced photographers and PhotoShelter members to share their top tips for those looking to get ahead in their photography careers. From finding your own visual voice to working with a mentor or photo assistant, each piece of advice listed […]
-

What’s On Your Photography Holiday Wish List?
The holiday season is around the corner and that means it’s the perfect opportunity to upgrade your gear or find that special gift for the visual storyteller or photography enthusiast in your life. We reached out to a handful of renowned photographers and PhotoShelter members, each with their unique styles and preferences, to bring you […]
-

Share a Photo That Means the World to You
We all have a photo that means the world to us. Maybe it’s one we made ourselves – the first photo from our first camera. It could be an old family photo in a beloved photo album. Or maybe it’s an iconic image that hangs on our wall at home. With World Photography Day coming […]