Share
Back to Basics: Food Photography Lighting & Styling
In today’s foodie/cellphoneography/Instagram world, everyone is a food photographer. It’s almost customary to take a photo of your food before ...
In today’s foodie/cellphoneography/Instagram world, everyone is a food photographer. It’s almost customary to take a photo of your food before digging in. Some restaurants have even had to instate a “no photography” policy because patrons complain about the constant flash of cameras.
Food photography, however, plays a huge role across many different businesses. Previously limited to the food industry (restaurants, markets, specialty food stores) and food-dedicated publications, food photography now spans a wide breath of editorial publications and commercial/advertising campaigns. Food is most often associated with comfort and happiness, so it’s no surprise that clients like American Express and CNN are now seeking food photographers.
Bottom line? No matter what kind of photographer you call yourself, it’s advantageous to have some food photography skills under your belt. You’ll also want to stand out from the crowd of amateur food photographers – showing clients that you have the experience and know-how to deliver the best images.
If you’re relatively new to the world of food photography, or just looking to brush up on your skills, start with lighting technique – specifically natural light. Like all photography, mastering lighting will ultimately take your creativity up a notch.
We talked with four full-time food and lifestyle photographers (and PhotoShelter members) to get their top tips. Here’s our crew of fantastic foodies:
- Ricky Rhodes: Cleveland-based photographer specializing in product, food, and people.
- Megan Young: Lifelong cook and professional food photographer from Sydney, Australia.
- Michelle Furbacher: Stock food photography business owner out of Vancouver, Canada.
- Lincoln Barbour: Portland-based award winning photographer with a focus on architecture/interiors, lifestyle, and food.
Here are their compiled 7 tips for shooting food photography:
1. Always keep white and silver bounce cards in your lighting kit
One essential piece of equipment in your lighting kit should be white and silver bounce cards, used to gently fill in any harsh shadows caused by window light. Ricky Rhodes advises photographers to use these cards to bring details back into the deep shadows, ultimately adding more color and texture to your images.
")
Photos by Ricky Rhodes
The bounce cards are also important because you should rarely be shooting into direct sunlight. As Michelle Furbacher says, you want to avoid too much contrast so that food looks soft and elegant. You can also use the bounce cards to direct more light onto the image to highlight certain features and make your photos “pop”.
")
Photo by Michelle Furbacher
To get the same effect, Lincoln Barbour uses white and black foam core, and glues aluminum foil on one side for a silver fill. He also always carries white translucent panels for when the light is too harsh. “I use PhotoFlex LitePanels on the window to soften and diffuse the light.”
")
Photos by Lincoln Barbour
If you’re not into using bounce cards, silver reflectors and mirrors are great options, too. Megan Young prefers working with reflectors because they can be curved and bent to shoot around. “I find reflectors easy to work with and handy to fold up and store,” she says.

Photos by Megan Young
2. Bring your focal point forward
The focal point of any great food image is the dish itself. Props and garnishes can help tell the food’s story, but they should never distract from the main event. Ricky Rhodes suggests focusing near the front edge of the food. This naturally draws the viewer in to the rest of the frame. You also typically want to shoot with the aperture wide open to deliver shallow depth of field and isolate the food in your frame.
")
Photo by Ricky Rhodes
Michelle Furbacher recommends finding the “hero” – the perfectly shaped raspberry, strip of basil, or trail of melting ice cream that looks like the part you most want to eat.
This helps you create good bokeh – the out-of-focus and intentionally blurred areas of an image that are pleasing to the eye. “A significant amount of blur to the background will make your focal point really pop,” explains Michelle Furbacher. It leaves a little to the imagination, and also puts the focus on your hero.
")
Photo by Michelle Furbacher
Another trick to remember is the golden spiral or “@” symbol that starts a central focal point and then carries the viewer’s eyes wider and wider to take in the whole frame. Lincoln Barbour frequently employs this technique. He also recommends shooting at 100 ISO to get the maximum image quality (and less noise).

Photo by Lincoln Barbour
3. When in doubt, shoot overhead
Many amateur photographers fall into the trap of shooting food from an angle that makes it look like it’s about to slide off the plate (like this shot). Shooting overhead not only eliminates that possibility, but it also gives you more flexibility to add props to the frame. “I’m definitely a sucker for overhead shots,” says Ricky Rhodes.

Photo by Ricky Rhodes
But generally speaking, don’t limit yourself to one angle. Lincoln Barbour likes to think of the three basic angles to shoot food: from above, from the side, and from an angle. “Most food looks good shot at an angle because it’s usually prepared to be seen that way,” he says. “But dishes like salads, charcuterie, and pizza look great from above because they are flat. Tall dishes (sandwiches, ice cream, beverages) look best from the side because you want to see the height and layers.”

Photo by Lincoln Barbour
“And if that fails, food shot straight down – including a table setting and serving dishes – makes a great photo,” says Megan Young.

Photos by Megan Young
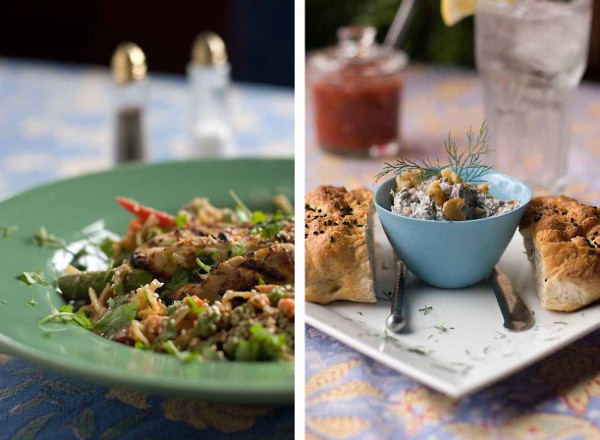
4. Build height
It’s easy for food to look flat, especially if it’s, well, a flat food like soup or spreads. It’s your job to find something interesting about even the most boring looking foods. Food photographers look to build height in dishes like this, most often by adding garnishes – fresh herbs, a dollop of sour cream, and lemon or lime wedges are all great additions to have on hand. Or if possible, literally stack your food.

Photo by Ricky Rhodes
One word of caution: “If shooting a recipe, always check with the editors first,” advises Michelle Furbacher. “Some editors are really opposed to adding even the smallest edible embellishment if it’s not listed in the ingredients.”

Photo by Michelle Furbacher
5. Mimic natural light
Not every day will be sunny – you know that, and your client knows that, but that can’t stop the shoot. Mimicking natural light is an art form in itself, and you’ll need a few extra lighting tools. Megan Young always brings her Profoto Actute B portable lighting kit with a large softbox, which acts as a big portable window when shooting on a cloudy day.
To help give her food photography a fresh and natural perspective, Megan sometimes shoots directly into the light. “Then the dish appears in front of a completely blow out background with lovely rim light,” she says, This technique works well with translucent foods like lettuce leaves and drinks. The result is a night highlight that outlines dishes and makes your images more vibrant.

Photo by Megan Young
")
Photos by Megan Young
When Lincoln Barbour finds himself in a bind, he heads to the brightest spot in the kitchen, restaurant, studio, etc. and then fixates a diffusion reflector over the food. “Make sure you set your white balance appropriately,” he advises. “If you want to start using strobes, then use the biggest softbox you can and put it as close to the food as possible, usually from behind and at 45 degree angle. This will create ‘north window light’ and then it’s a matter of modifying it like you would with natural light.”
")
Photo by Lincoln Barbour
Another idea: Ricky Rhodes likes to shoot a secondary light directly across the dish and mimic sun rays coming in through the window. “You can use small pieces of foam core to direct the hard ‘sunlight’ onto a specific part of the frame.” The resulting shadows add life to your images and bring out interesting details while still keeping soft light on the food.
")
Photo by Ricky Rhodes
A great backup is a continuous light source outfitted with fluorescent “daylight” bulbs. You can even use this as your primary light source and fill in the shadows with whatever natural sunlight is available. “It’s not as natural as the real thing,” says Michelle Furbacher, “but it’s always got my bad in dark times.”
6. Compliment food with props of similar colors and interesting textures
Food photography is often about telling a story. Who made this? What’s the occasion? What season it is? The right props can help you share this story – just beware of going overboard.
Try picking one standout color from the dish – say the strawberries in a strawberry rhubarb pie – and adding a small element that incorporates that color. It could be the paper that your dish sits on, dusted powdered sugar on the table, orange slices, a wooden cutting board, or a cup of coffee.

Photo by Lincoln Barbour

Photo by Megan Young
Michelle Furbacher shared some good tips for matching colors: “Cool colors and deep, rich blues can make brown and beige foods really pop and come to life. Warm, vibrant colors can liven up salad greens. You want to enhance the texture, color or contour of your food.”
")
Photo by Michelle Furbacher
You should also carry White and Black Gaffer Tape, as well as Blue Painter Tape. Lincoln Barbour folds up small pieces to make tiny shims for plated food, or to hold a utensil in place.
7. Make minimal adjustments in post to remove distractions
Much like photojournalists, professional food photographers prize themselves on little-to-no post-production. That being said, if a few crumbs or blemishes on the surface material are distracting, by all means remove them in Photoshop. You can also make some minimal adjustments to levels and curves, and color balance in Lightroom to get the exposure where you want it.
")
Photo by Ricky Rhodes
Some photographers also like to play around with the contrast, highlights, shadows and blacks. Certain fine-tuning can help further enhance your images, but strive to do 95% of the work should in camera.
Looking for more essential tips? Check commercial, editorial, and food photographer Jonathan Gayman‘s essentials for shooting mouthwatering food photography.
Learn something from this post? Share the knowledge and hit the “Tweet”, “Like”, “Share”, “Pin it”, or “Plus” button below.
Are you a professional photographer? Check out PhotoShelter — we make killer photography websites and offer over 100+ professional grade tools to help you showcase, store, share, and sell your images.
You May Also Like
-

Expert Advice and Top Tips from Pro Photographers for 2024
What’s one piece of advice you would give to aspiring or up-and-coming photographers? We asked nine experienced photographers and PhotoShelter members to share their top tips for those looking to get ahead in their photography careers. From finding your own visual voice to working with a mentor or photo assistant, each piece of advice listed […]
-

What’s On Your Photography Holiday Wish List?
The holiday season is around the corner and that means it’s the perfect opportunity to upgrade your gear or find that special gift for the visual storyteller or photography enthusiast in your life. We reached out to a handful of renowned photographers and PhotoShelter members, each with their unique styles and preferences, to bring you […]
-

Share a Photo That Means the World to You
We all have a photo that means the world to us. Maybe it’s one we made ourselves – the first photo from our first camera. It could be an old family photo in a beloved photo album. Or maybe it’s an iconic image that hangs on our wall at home. With World Photography Day coming […]