Share
Gear Up, Clip In & Let’s Go: 18 Adventure Photography Tips to Help You Nail the Shot
Adventure photographer Craig Hoffman’s work makes you want to get off the couch and suddenly pick up an extreme sport. “What thrills me about p...
Adventure photographer Craig Hoffman’s work makes you want to get off the couch and suddenly pick up an extreme sport. “What thrills me about photography is the technical and creative aspects in one medium. Behind the camera and in the mountains is where I feel most at home,” he says.
While some adventure photographers focus on getting that one epic shot, Hoffman has a knack for capturing the smaller moments and making you feel like you were along for the ride. He recently reached out to us to ask if he could share some of his lessons and pay it forward for the next set of adventurous photographers hitting the trails.
Before jumping into this guest post, we want to say a special thank you to him for these insights.
All images by Craig Hoffman.

The following is directly from Craig Hoffman:
Being an adventure photographer sounds amazing and most of the time it’s a dream come true. That being said, it’s also one of the more demanding and specialized disciplines within the field of photography. Often I find myself far in the backcountry, miles from the nearest trailhead or road dealing with the elements that Mother Nature is throwing at me. I’m sharing some tips and lessons I’ve learned along the way. Clip in and let’s go!
Fitness: I often find myself shooting athletes who are extremely fit and talented in a particular mountain sport like rock climbing, mountain biking, trail running, and skiing. Being able to keep up with them is key to getting the great adventure shot. You don’t want to be the out of breath, winded photographer holding up the group!
- Pack the night before: Bring only the essentials for the shoot and yourself. Keep your pack light so that you can move fast. My F-Stop Loka UL is a perfect size for day shooting. It is small so overpacking is not an issue.
- GPS: Study the route on Google Maps or Gaia GPS. Find key spots where you might be able to move ahead quickly and to shoot from.
- Head out 10 to 15 minutes before the group: It allows for a few extra minutes to set up and shoot unnoticed. I usually play a game of leapfrog with my subjects. This works well with skiing, hiking or mountain biking into a location.

Safety: Staying safe in the mountains is the most important aspect of adventure photography. Mountain weather in all seasons can be unpredictable. Storms build up within minutes with a deluge of rain, thunder, and dangerous lightning. Climbing presents its own unique risks including dangerous terrain and rock fall. There are numerous ways to help mitigate these risk including following seasonal weather forecasts and patterns, carrying proper equipment, appropriate safety gear and most of all, education. Here are some helpful takeaways:
- Clothes: Keep a waterproof/windproof jacket in your camera pack.
- Water Protection: Ziploc Freezer bags are an inexpensive way to protect your camera accessories from wet weather.
- Hats: I pack a couple of these. I keep a wool ski-style hat for cool and cold weather and an old truckers hat for warmer temps/sun protection.
- Sunscreen: Being at altitude you are closer to the sun, which translates to intense radiation or sunburn.
- Hydration: At altitude, you should drink more water. You will feel better and it will keep your energy up. Consider using a CamelBak / bladder type system and when I’m shooting all day I like to take a SteriPen to purify water from streams or lakes. In cold weather, bringing a thermos of tea or hot chocolate can be a game changer.
- Food: Running around the mountains burns a lot of calories. I always keep spare energy bars in my camera pack.

Power:Today’s modern photography equipment is amazing. Most cameras and accessories (Strobes, iPhones / iPads, Grips, etc…) just sip power to conserve battery life. But the fact of the matter is they still require power and when in the backcountry a power source can be nearly impossible to find.
- This might seem obvious but I always carry several extra sets of batteries for all my devices. Before shoots, I always fully charge my camera batteries regardless of their power state.
- If I’m shooting in extreme cold, think Colorado snowy mountains, I always keep batteries warm by keeping them close to my body. A few of my accessories still use AA or AAA batteries like my strobes and light meter. I spend an extra couple of dollars and buy lithium AA or AAA batteries. They have much better performance in the cold than standard alkaline ones. Regardless of the battery chemistry, electronics like to be warm and will perform better if kept from the cold.
- Think about external battery packs and solar recharging to give your iPhone, iPad and other accessories some extra life. Goal Zero makes excellent, lightweight solar recharging products.

Equipment: I am not sponsored so there is no financial bias here. F-Stop Gear, Goal Zero, Gaia GPS, Patagonia, Black Diamond, Petzl, SteriPen, PhotoShelter, Adobe Lightroom and Canon are my staples for adventure photography. They all make wonderful gear and software that I use and depend on in and out of the field.
About his workflow:
Often times my clients want to see quick JPG images of the shoot, I set my Canon 5D to shoot with RAW + JPG. Using Lightroom Classic CC with the PhotoShelter Plugin allows me to make a few quick edits, create a gallery, and upload to PhotoShelter all within Adobe Lightroom. My clients then login into my PhotoShelter site, view the shoot, download any images and pick their favorites. Super quick and easy.

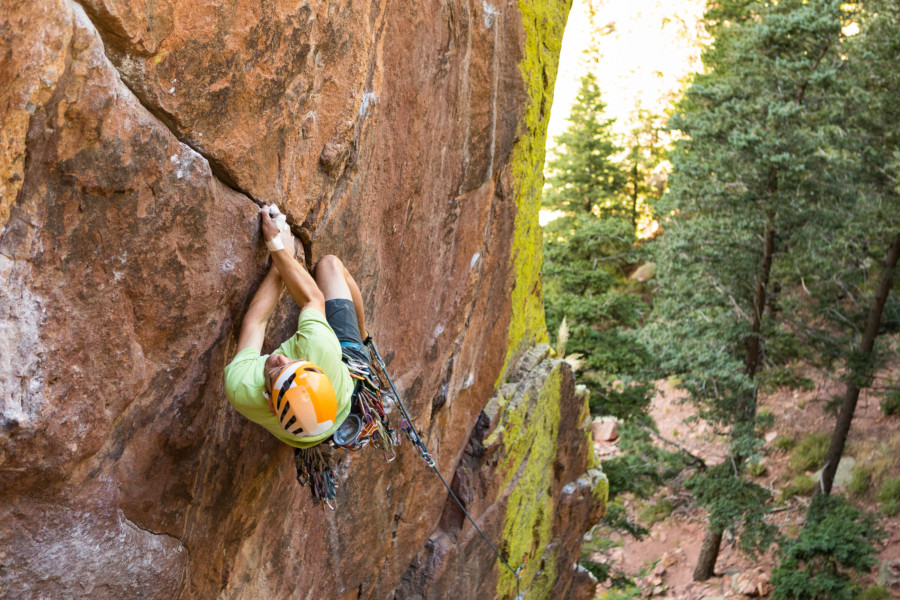
One of my favorite sports is climbing. I love capturing the stress, tension, and often fear in a climber’s face when challenged. Also, shooting climbing takes me to some magical locations like Eldorado Canyon in Colorado, Yosemite National Park in California, Indian Creek in Utah, and Denali National Park in Alaska. Climbing outdoors requires training and experience. Shooting climbing requires even more training, skills, and solid judgment. Here are a few tips I’ve learned along the way:
- Static line: A static line is a rope that has
very little stretch. Regular climbing ropes you find in the gym and elsewhere stretch to absorb energy when you fall. Since you will be ascending this line, the last thing you want is a stretchy rope. I recommend getting a 60m or 70m static line. But do not lead climb on this rope! - Climbing Anchors: I often find myself hiking around to the top of the rock to set up an anchor to attach my static line. Be mindful of your surroundings. Sending down loose rocks and dirt on your subjects won’t make any friends and can be super dangerous. If you are unsure about building anchors ask your (subject) climber. Many times, if there is not a walk around, I ask my subject to setup my fixed line near where I would like to shoot. They’re often thrilled because it allows them to warm up. If you have anchor set-up questions, numerous companies and organizations offer courses on climbing and anchor building, Just be sure to look for the American Mountain Guides Associations logo.
- Carrying Gear: When ascending a fixed line I bring everything. I personally find it’s easier to have multiple camera bodies with different lenses rather than taking up one body with several lenses. Make sure your camera straps are securely attached to both you and its body. Don’t bring a backpack. Though it might make sense because you can carry more gear, ascending a fixed line is hard enough. I’ve found that backpacks pull you
backwards - Ascending and Descending: One piece of essential technical gear I use and depend on for shooting is my Petzl Grigri. The benefit of a Petzl Grigri is I can ascend and descend the rope to find the right angle to shoot at.
- Level Headed: Looking through the camera’s viewfinder, focusing on the climber’s movement and shooting frames all while you are hanging in space is hard enough. Often times, you get an amazing shot of the climber but the background is tilted with trees sideways and mountains at an unnatural angle (we have all seen these shots). The solution is to use the level in your camera or buy a small bubble level that attaches to the hot shoe. I prefer the in-camera level because it frees up my hot shoe for additional lighting or remote accessories. The Canon 5D Mark IV has a built-in level that’s displayed in the viewfinder.
- Comforts: Finally, I always find myself hanging from a fixed line for an extended period of time. Traveling up and down the line is time-consuming and energy sapping. Having a comfortable harness is essential. Black Diamond and Petzl make some of the best harnesses for hanging around. Also, my Patagonia Houdini jacket, which can clip on to my harness, adds almost no weight and takes the chill off when a cool breeze kicks up.
I once dropped a lens hood from my Canon 24-70L lens from several hundred feet off the deck and it shattered into a million pieces. Lucky no one was hurt and hoods are inexpensive. A lens on the other hand….
My work is about storytelling in stills and motion. Some of my assignments have included traveling to just about every 10th Mountain Division Hut in Colorado in all four seasons, I’ve hung from static lines in some of the most beautiful climbing destinations in the world, waded in freezing gold medal rivers for a prized monster rainbow trout to be caught, positioned myself on a mountainside to shoot a ski descent and stayed up late to photograph the glorious Milky Way galaxy.

You can keep up with Craig’s next adventure by following him on Instagram, Facebook, and Twitter. We’d love to continue this by hearing your tips and lessons from the trails, mountains, and more. Comment below to share your stories!
Previous Post: OMG, You’re Still Entering Photo Contests?
You May Also Like
-

Expert Advice and Top Tips from Pro Photographers for 2024
What’s one piece of advice you would give to aspiring or up-and-coming photographers? We asked nine experienced photographers and PhotoShelter members to share their top tips for those looking to get ahead in their photography careers. From finding your own visual voice to working with a mentor or photo assistant, each piece of advice listed […]
-

What’s On Your Photography Holiday Wish List?
The holiday season is around the corner and that means it’s the perfect opportunity to upgrade your gear or find that special gift for the visual storyteller or photography enthusiast in your life. We reached out to a handful of renowned photographers and PhotoShelter members, each with their unique styles and preferences, to bring you […]
-

Share a Photo That Means the World to You
We all have a photo that means the world to us. Maybe it’s one we made ourselves – the first photo from our first camera. It could be an old family photo in a beloved photo album. Or maybe it’s an iconic image that hangs on our wall at home. With World Photography Day coming […]