Share
WATCH: How to Capture Action with Joanie Simon
With the right amount of practice and preparation, a stunning action shot is within reach – even when you’re on your own at home. Get the right...
With the right amount of practice and preparation, a stunning action shot is within reach – even when you’re on your own at home. Get the right set up and you’ll be making magic in no time.
We teamed up with Joanie Simon, commercial/editorial food photographer and YouTuber (check out her channel, The Bite Shot) for a live demonstration at her home studio in Arizona.
Joanie walked us through the necessary steps for expertly freezing motion on camera then answered all your questions about her process and the gear she used along the way.
Watch the entire on-demand recording here and be sure to tweet any lingering questions to @photoshelter.
Watch to learn:
- How to set up and photograph an action shot without an assistant
- Perfecting the test shot before it’s officially go-time
- Ideas for props and accessories to help you get the perfect photo
- Other helpful tips from Joanie’s upcoming book, Picture Perfect Food
Cover image by Joanie Simon
On-Demand Webinar: How to Capture Action – A Live Demo with Joanie Simon
Our Q&A with Joanie
Thank you to everyone for submitting questions for food photographer Joanie Simon. Feel free to tweet any lingering questions @photoshelter.
This Q&A was edited for clarity and length.
Where does PhotoShelter come into your workflow? What happens once you’ve edited in Capture One and you’re satisfied with the edit?
JS: Absolutely. At that point, depending on the specifications – so for example, my book – I delivered all of the final images for my book to the publisher via PhotoShelter. Once I had the images fully edited, did all the retouching in Photoshop, and got it to where I wanted it, then I exported that to the client or the publisher or wherever those images were required.
One of the things that I like about PhotoShelter that has saved me is, if we’re working with any sort of image, then the client can download it in different sizes – So, if you’ve got a client who’s going to use it for their website and social media, but then also using it for print.
In that case, they’re going to need that full resolution TIFF file in Adobe RGB color space, but then they can also just export a smaller sized JPEG to throw up on Instagram. So, it does have that flexibility, but that’s usually the last place for me.
Then once I’ve selected images, there is the ability then to upload raw files and XMP files, which can be really important for shoots and clients and we want to make sure that we’re not losing those.
I do have a really great redundant storage set up here at the studio, but it is nice to have that additional redundancy on PhotoShelter. If, Heaven-forbid something happened to our network area storage or something, I would always still have those raw files available.
So PhotoShelter is usually the very last place for me. And then I can just send the link out to the client for them to access the files and get whatever they need. And the best part is, come a year later, they’re like, ‘Hey, do you still have this such and such photo?’ And it’s all still in there. It’s really easy to just re-send them a link.
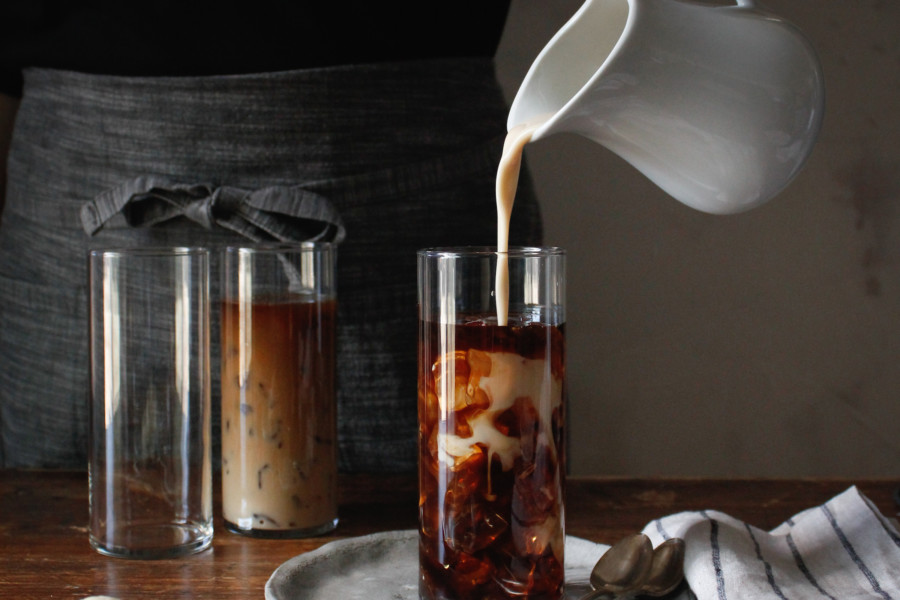
Do you have any tips for capturing things like beer foam or champagne bubbles – drinks where effervescence is what’s important?
JS: That’s definitely all about the timing. For those shots, make sure that everything is locked, even work with a dummy. Maybe we’ve poured the champagne so that we know, because glassware that’s unfilled versus filled will look different.
Pour a glass of it and really get engaged, making sure it looks the way it needs to. And then when you’re ready, put in the final, fully cleaned glass and then add the liquid so that you do get that effervescence factor. It’s really just all about time.
I’m not necessarily a dedicated drinks photographer, because to me that’s a whole category in and of itself. And so, there are folks out there like Rob Grimm, who has some great drinks-specific tutorials.
There are tips like stirring some bamboo in beer to get the head to come back or sprinkling salt on it. There are lots of little tricks and tips and I’m sure some that I’ve never even explored as somebody who’s not necessarily a dedicated drinks photographer. But I’d recommend checking out proedu.com.
Do you typically work with a food stylist or are you doing it on your own?
JS: My entry into food photography was through blogging and styling and shooting my own food. So, I would say that’s certainly something I’m capable of doing and it has been a distinct advantage during the pandemic because there are clients that know I can do it all if need be.
That also works great for smaller budget shoots and things like that. But for sure, when I’m working a shoot where we have a lot of shots or a lot of work, or there’s specialty stuff that’s outside my wheelhouse then for sure, I’m working with a food stylist. Because to me a food stylist, in addition to making the food look beautiful and knowing tips and tricks that I don’t know, it’s also just a matter of efficiency of time.
In terms of set ups, I can get through three in a day – if I’m really prepared and really on my game and pedal to the metal. But if I’m working with a pro stylist, I can get through six to eight in a day, so it all depends.
There’s a cookbook that I shot a couple months ago and I ended up working with a really great pastry chef. And because the author wasn’t able to come to us, we had to create it all. And baking is not my forte, so hiring that out was key.
Do you have any tips about backdrops and props and where people can find them?
JS: Yeah. There are lots of different kinds of props and backdrops. The ones that I’m using here today, the one that’s on the surface is my all-time favorite surface shop, Erickson Surfaces. They’re out of Southern California. Ginny Erickson, she’s a genius and they’re just super high quality, they stand the test of time and they’re beautiful works of art.
The one that’s in the background is a homemade version, which I actually have a YouTube video all about how to make your own. I would say people who don’t necessarily like that sort of tactile, playing with paint sort of thing – you may not enjoy that as much, but that is definitely a solution. Then there are a lot of other more affordable solutions because I will say Erickson Surfaces, they do cost a bit more.
For folks who don’t necessarily have the budget for something like that, there are some great printed solutions out there like Bessie Bakes Backdrops and Best Ever Backdrops. There are a lot of different ones. I’ve got them all linked on my gear page.
Then, in terms of glassware and silverware, certainly second-hand stores and antique stores are great options. You can find some cool things depending on where you’re at. I do a lot of damage on eBay and on Etsy, too. I especially like handmade ceramics because they have a lot of visual interest in texture and they’re not quite so perfect. There’s character there.
For me, when I’m looking for props and props that I think will be versatile, having something that’s more matte is important in terms of that sheen and shine. That’s not to say that we can’t create beautiful images with shiny things. We certainly can, but it can be easier if it’s a matte surface.
Then I go for things that are more neutral in colors, just so that they’re not distracting. Because again, the food is the focal point. So there’s not a lot of red dishes or neon green dishes in my products collection. A lot of it’s going to be all varieties of taupes, grays and browns and things like that to really make the food the hero.
If you’d like to see Joanie’s live demo, along with the questions asked here, watch the on-demand webinar above.
Plus, don’t miss Joanie’s gear recommendations and the release of her upcoming book, Picture Perfect Food.
You May Also Like
-

Expert Advice and Top Tips from Pro Photographers for 2024
What’s one piece of advice you would give to aspiring or up-and-coming photographers? We asked nine experienced photographers and PhotoShelter members to share their top tips for those looking to get ahead in their photography careers. From finding your own visual voice to working with a mentor or photo assistant, each piece of advice listed […]
-

What’s On Your Photography Holiday Wish List?
The holiday season is around the corner and that means it’s the perfect opportunity to upgrade your gear or find that special gift for the visual storyteller or photography enthusiast in your life. We reached out to a handful of renowned photographers and PhotoShelter members, each with their unique styles and preferences, to bring you […]
-

Share a Photo That Means the World to You
We all have a photo that means the world to us. Maybe it’s one we made ourselves – the first photo from our first camera. It could be an old family photo in a beloved photo album. Or maybe it’s an iconic image that hangs on our wall at home. With World Photography Day coming […]