Share
6 Lighting Tips to Elevate Your Portrait Photography
Last year, we made it our mission to emphasize the importance of mentorship and community programming. After launching the inaugural PhotoShelter m...

Last year, we made it our mission to emphasize the importance of mentorship and community programming. After launching the inaugural PhotoShelter mentorship class with an incredible group of PhotoShelter members, plus our guide on photography mentorship, we brought together a second class of photographers and hosted a handful of inspiring presentations, focused on topics ranging from business and marketing to technique.
Our friend, professional photographer and long-time PhotoShelter member, Darren Carroll, joined us during his busy schedule to chat about his experience in the industry and how he approaches the all-important topic of lighting.
In the spirit of learning and sharing more resources in the new year, we’re breaking down some of Darren’s tips on lighting so you can elevate your photos and take your technique to the next level. If you missed last week’s interview with Darren, get to know him here and check out more of his portraits on our Instagram.
Cover photo by Darren Carroll
1. Keep it simple.

Sometimes limiting your tool set will allow you to focus more of your attention on the assignment at hand, and your expertise with one light or one piece of gear will shine through.
“My first assignment during the pandemic, in April of 2020, was to photograph Texans (now Cardinals) wide receiver Deandre Hopkins for the cover of Sports Illustrated. The only way he would agree to the shoot was if we did it outdoors and without any other people on set. So I kept it simple by necessity, finding a shady spot at the location and putting up one battery-powered light with a little fill on the other side.”
– Darren Carroll
Keeping your lighting kit simple gives you more time to work directly with your model and spend less time worrying about perfecting your settings and setting up your gear.
One light and a basic setup can be a lot more powerful than you might think. Our friend, fashion and portrait photographer Lindsay Adler, has a ton of great resources about using one single light source, too.
Pro tip: If you’re on assignment by yourself, consider the size of your stands, modifiers and reflectors or you may find yourself struggling with ‘sand bags galore.’ Keep it simple!
2. Assist and find assistance, but don’t lose sight of how to light an image on your own.

Read more about this photoshoot on Darren’s blog.
3. Plan ahead, and test often.
When given the opportunity to photograph on location, planning ahead will make your job a whole lot easier. You never know how external forces or logistical red tape might affect your original plan.
Visit the spot beforehand, consider all outside elements that might come into play, arrive early and always test your equipment!

“I was given about 20 minutes at high noon in Phoenix to photograph then-Diamondbacks star Justin Upton for ESPN: The Magazine. Getting him lit properly while exposing for the interior of the stadium was a bit of a challenge at that time of day.”
– Darren Carroll
For Darren, arriving two hours early provided him enough time to scout the perfect location for Upton to pose, and allowed for at least half an hour to test the lighting gear. With an assistant or two on hand, Darren and his team were able to try a few versions of the photo before the talent arrived. Every aspect of the lighting setup was tweaked and tested until they were ready to go. Practice makes perfect.
4. Rent your gear and find what works for you.
Let’s be real – camera gear, and specifically lighting equipment, can be pretty expensive. One Profoto B10 can cost you nearly $2000.
While you’re saving up for a serious lighting setup, use every opportunity available to rent equipment and learn the ropes. This might mean coughing up some money to get started, but renting for your photoshoot won’t cost you nearly as much as making a final purchase.
If there’s an option to work within a client’s budget, even better! Use your resources and your connections to find the right gear, then consider making a larger investment once you know what you need in your personal tool kit.

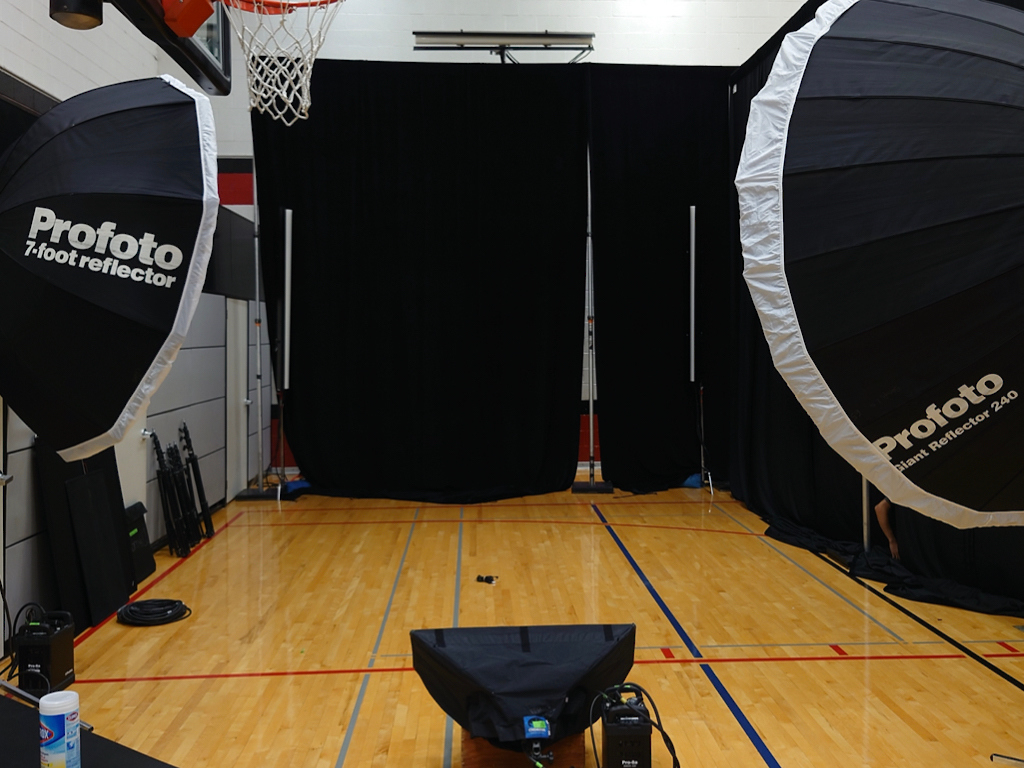
Seen above is Darren’s set up at the NBA Rookie photoshoot for Panini America. For this photoshoot, a large rental cost was covered by the client, however the experience of trying new equipment or getting more familiar with great gear is the takeaway here. Rentals can inspire you and open doors.
At the back of this closed-off section is a set of three Profoto striplights. With a very tall, narrow and defined shine, these striplights provide a perfect rim light for an action shot like this. It’s become a fun favorite for Darren, and “the most amazing thing he’s ever seen.”
Rent your gear and you might just find a new favorite piece to purchase when the time is right.
5. Experiment with light and color.

“I wanted to use the color of blues guitarist Zac Harmon’s instrument to contrast with an otherwise monochromatic in-studio portrait. I used 2 strobes–main to camera right with a little bit of fill on the left–and dialed in a white balance to get that bluish-hue, and let the guitar just pop from there.”
– Darren Carroll
Oftentimes, the color choices you make are just as important as light and shadow to the overall mood of your image. If your model or subject is primarily highlighted in warm tones, contrasting with cool colors can create a really pleasing juxtaposition. Going all in on one color temperature can make for a really strong and striking monochromatic image, too.
Gels in particular can be fun to experiment with when considering color, and can add some emotion to an otherwise ‘stale’ photo. In Darren’s photo above, however, it was all about tweaking the in-camera white balance for a desired effect. Color theory can be very important when learning to light and compose your portraits.
6. Sometimes it’s best to just leave your lighting kit in the car.
Natural light does wonders. Even if you own a few stands, strobes and modifiers, sometimes the scene is already set up for success. Never underestimate the power and the beauty of sunlight, moonlight or any ambient light around you.

“I’ve done quite a bit of work with Texas music legend Robert Earl Keen. One day we were at his ranch near Bandera, Texas; the plan was to shoot some portraits of him in his ‘Scriptorium,’ an outbuilding away from the main house where he retreats to write. As I was puttering around setting up equipment, he stepped outside the doorway for a little fresh air. And that was that.”
– Darren Carroll
If you’re able to visit your desired location ahead of time, try to get a good sense of the available light around the area. Time of day will certainly play a role here, but if you find the right pocket of light you’re looking for, there might be no need for lighting gear at all.
It all comes down to your creative vision. Your perfect image might be achievable with a single camera in hand and a window nearby.
“Just as important as what’s in your lighting kit is your ability to see the light that’s already there, and make the decision to leave it all in the car trunk.”
Want to learn more from Darren Carroll? Watch our on-demand conversation with Darren and fellow sports photography legend Jean Fruth, then check out Darren’s PhotoShelter website for more photos, blog posts and limited edition prints.
Previous Post: Joe McNally Dishes “The Real Deal”
You May Also Like
-

Expert Advice and Top Tips from Pro Photographers for 2024
What’s one piece of advice you would give to aspiring or up-and-coming photographers? We asked nine experienced photographers and PhotoShelter members to share their top tips for those looking to get ahead in their photography careers. From finding your own visual voice to working with a mentor or photo assistant, each piece of advice listed […]
-

What’s On Your Photography Holiday Wish List?
The holiday season is around the corner and that means it’s the perfect opportunity to upgrade your gear or find that special gift for the visual storyteller or photography enthusiast in your life. We reached out to a handful of renowned photographers and PhotoShelter members, each with their unique styles and preferences, to bring you […]
-

Share a Photo That Means the World to You
We all have a photo that means the world to us. Maybe it’s one we made ourselves – the first photo from our first camera. It could be an old family photo in a beloved photo album. Or maybe it’s an iconic image that hangs on our wall at home. With World Photography Day coming […]