Share
File Delivery Made Easy with PhotoShelter
All working photographers know that making photos is only the beginning of nailing an assignment. After you put your camera down, there’s editing...
All working photographers know that making photos is only the beginning of nailing an assignment. After you put your camera down, there’s editing, uploading files to your archive and then delivering them to your client. For many, that final step is where things can sometimes get a little tricky, but we’re here to help.
Tight deadlines, your comfort level with your client and even familiarity with technology all play a factor in choosing the best delivery method for you.
It’s essential that delivery be easy for your client but still super secure for you.
PhotoShelter provides an extremely flexible and powerful set of tools to control how your website visitors and clients may interact with your images. You control who sees your images, as well as who can download them, at what size they may be downloaded, until when, and more. But with so many options at your discretion, it can be hard to determine which delivery method is best.
Below, we’re breaking down four scenarios and outlining which delivery method is best — and why.
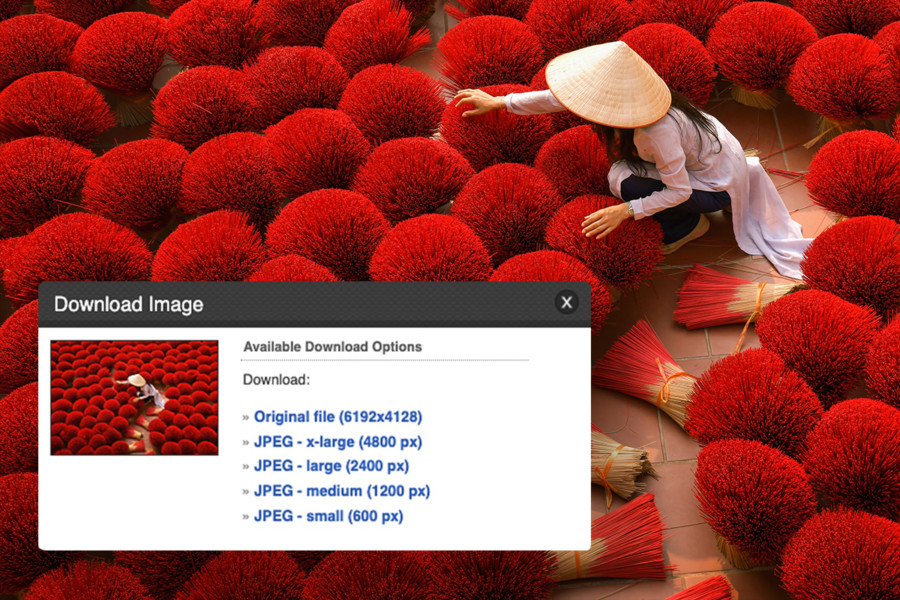
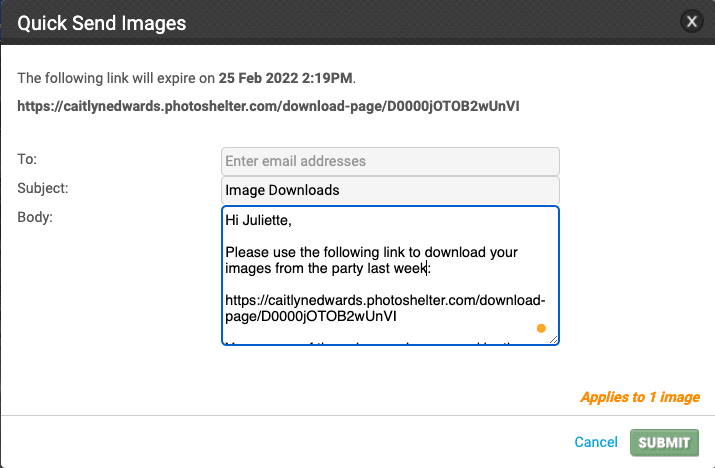
You want your client to click a link and download images right away
In this case, our Quick Send tool is the way to go. It’s a favorite around here.
Quick Send is a great way to send a few (or many) images to a client without logins, passwords, attachments or the need for third-party services. When setting it up, you also have full control over what resolution you’re providing, from the original file size and format to something much lower resolution.
Say bye-bye to Dropbox and WeTransfer! With Quick Send, you’re sending a unique download link to your client that still includes your website’s URL. The entire experience is professional and fast.
This option is located in the “Actions” menu of your Image Browser or in the top right when you have a single image open in the center pane. To make things that much more secure, the link is only valid for one week, after which it expires and your client will need a new one.
Built to give you full control over how you share it, email the link from directly within your PhotoShelter account or, if you’ve already got an email chain with your client or prefer to text it, you’ve got that option too. Just copy the auto-generated link and send away!
(Note: click to enlarge this image.)
Our team is always gushing over how simple and special this tool is. “Quick Send is the delivery solution I use when sending RAW, untouched files to clients. They can quickly download a batch of RAW files and give me immediate feedback on edits and filters they’d like to see on the final images,” says Sarah Pace, a Senior Technical Support Specialist at PhotoShelter.
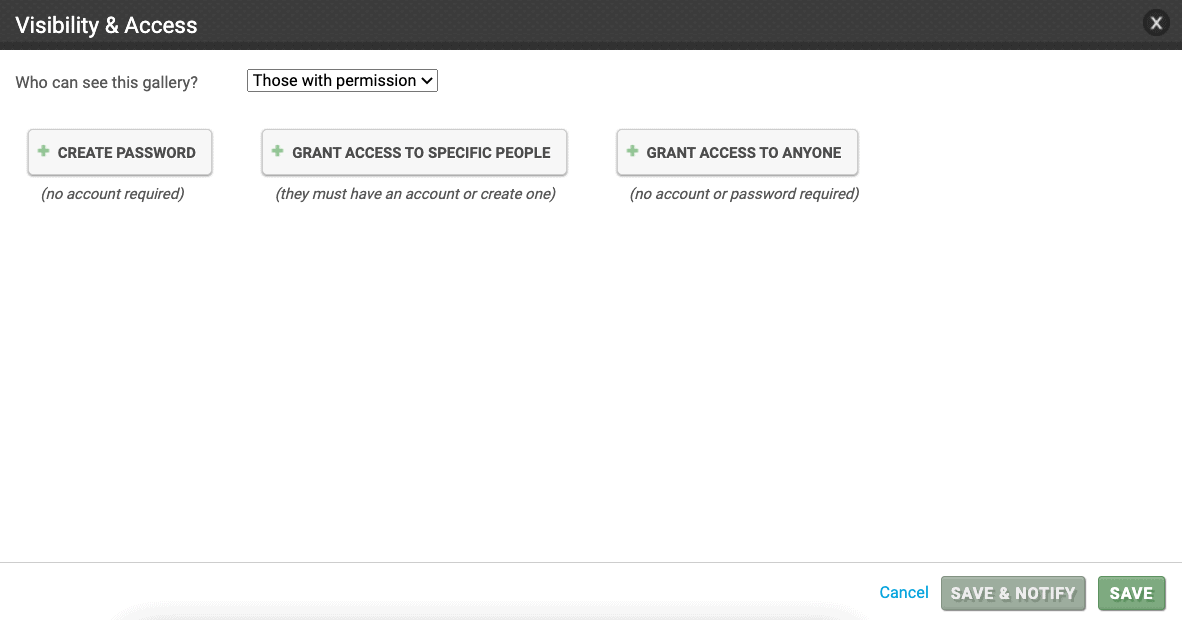
You want your client to enter a password
One of our most used delivery options is the password-protected gallery. With passwords, you’re able to authorize anything from view-only access all the way to full download permissions. So whether you just want your client to review your latest set of images on screen or get the full resolution files on their hard drive, passwords allow for it all.
A password is a great option if you’re looking to keep things simple, hoping to give multiple people access or your client is a little less tech-savvy. To set it up, you’ll select the gallery you want to share, and then click the “Visibility and Access” toggle on the right pane of your Image Browser. From there, select your Visibility settings and choose the “Create Password” option. Type in your preferred password, set the resolution if you’re granting downloads, note the duration of the permission and save.
Just remember that while super straightforward for your client, there’s no way to prevent them from sharing the password with others! (If that’s a concern, then opt for a more secure permission option.)
(Note: click to enlarge this image.)
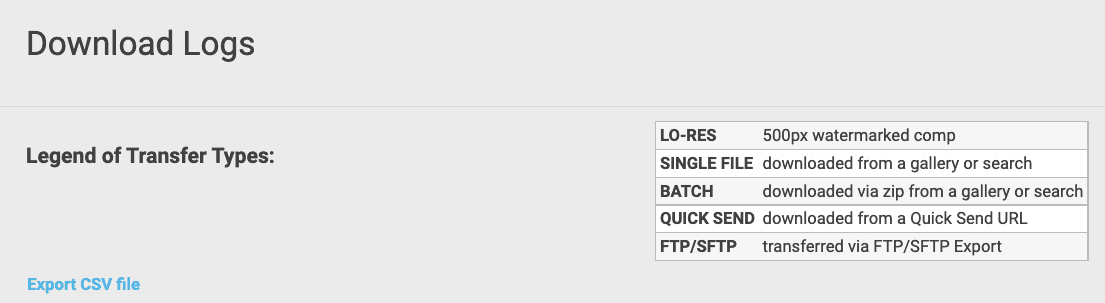
You want your client to log in with an email address
Email login permissions work a lot like our password option, but with an added layer of security.
With this option, you’re granting access to specific people and as a result, your client is prompted to log in with their personal email address and password. Unlike the password option where you simply share the unique password with your client, email login permissions take the security up a notch because they require your client to have their own personal (and free!) PhotoShelter account. This is a great option if you have a recurring client and want them to be able to access their files without you all in one place.
Nonetheless, email permissions have the same view-only and download options passwords do. Just select “Visibility and Access” in the right pane of your Image Browser, and in this case, choose “Grant Access to Specific People.”
One advantage to using the email option is that you have better tracking of who downloaded which images when. Your Download Log will show the name of your client as well the type of download — single, batch, you name it. Other downloads using different types of permissions, like a password or Quick Send, will just display an IP Address.
(Note: click to enlarge this image.)
You want to give your client free rein of your site (within reason)
Our Trusted Client option is another great tool for recurring clients. In fact, it’s built for them.
The Trusted Client feature allows you to assign sitewide download permission to certain individuals. Rather than assigning download access at the gallery or collection level, with Trusted Client you are allowing the client to download anything they may view, whether it’s from search results, contained within an unlisted gallery, or anywhere else. (Note that Trusted Client does not allow people to see images they aren’t otherwise able to view — it simply allows any viewable image to be downloaded at a maximum size you designate.)
Designating a Trusted Client is a quick process: you’ll set it up in your PhotoShelter Address Book under the Clients menu. Once you open your Address Book, add your client: their name, email address, company, etc., and choose the download resolution you want them to have access to.
Now that you have them set up, you can grant them access to their specific galleries or collections and have them simply log in to their account in the Client Area section of your website. (That section of your site is located in your Archive menu and has a link like https://[yourname].photoshelter.com/usr/invites or https://[yourdomain].com/usr/invites.)
Our Trusted Client option makes you look especially professional because all of your site’s branding exists throughout the client’s entire login and download experience. No need for third parties, no external branding. It’s all you.
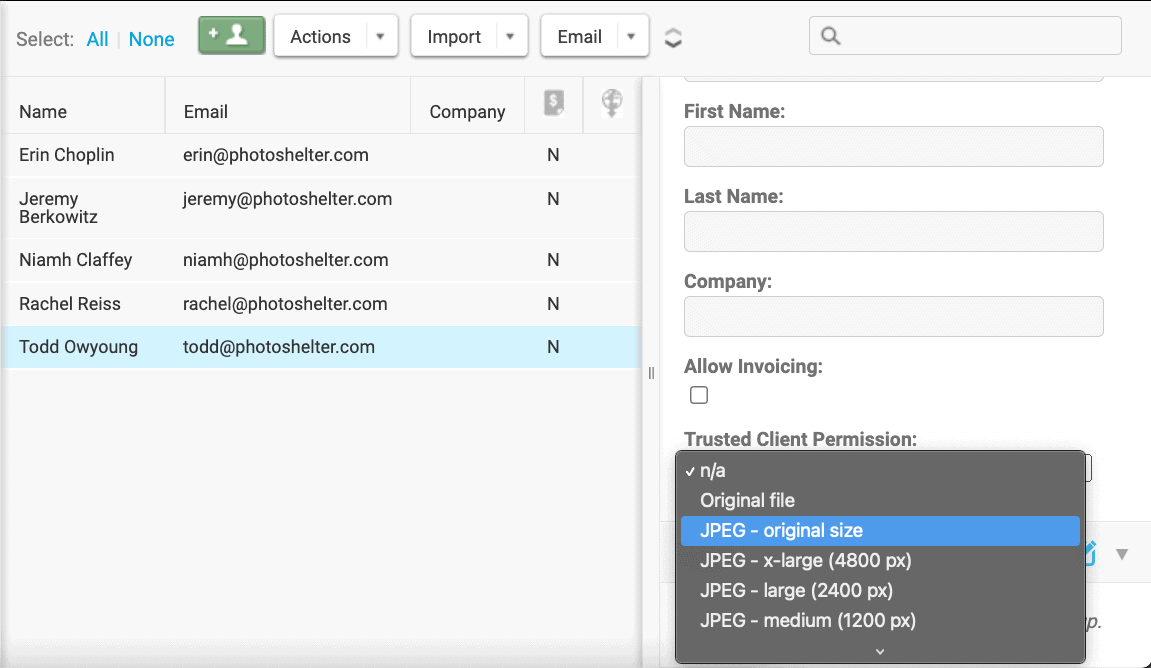
(Note: click to enlarge this image.)
And that’s not all…
In addition to Quick Send, passwords, email logins and Trust Client access, there are a few other options to consider depending on your use case and clients’ needs.
If collaboration is your goal, use our Client Proofing Tool. This tool provides an easy way for you and your clients to select your favorite images from a shoot. Clients can make their selects and send them to you for further processing, and you can see exactly what they want without the need for back and forth emails, handholding or any instruction whatsoever. It simplifies the entire image selection workflow for both you and your clients.
Note: this feature is available for Standard and Pro subscribers only.

(Note: click to enlarge this image.)
If your client would like to receive images via FTP, you can do that with PhotoShelter too. FTP is the preferred delivery method of many, particularly editorial publications and wire services. Just use Outbound FTP. You can even send to multiple concurrent destinations – without your computer even being on. (Once the FTP transfer starts, you can be on your way! We’ll notify you by email once the FTP is complete.)
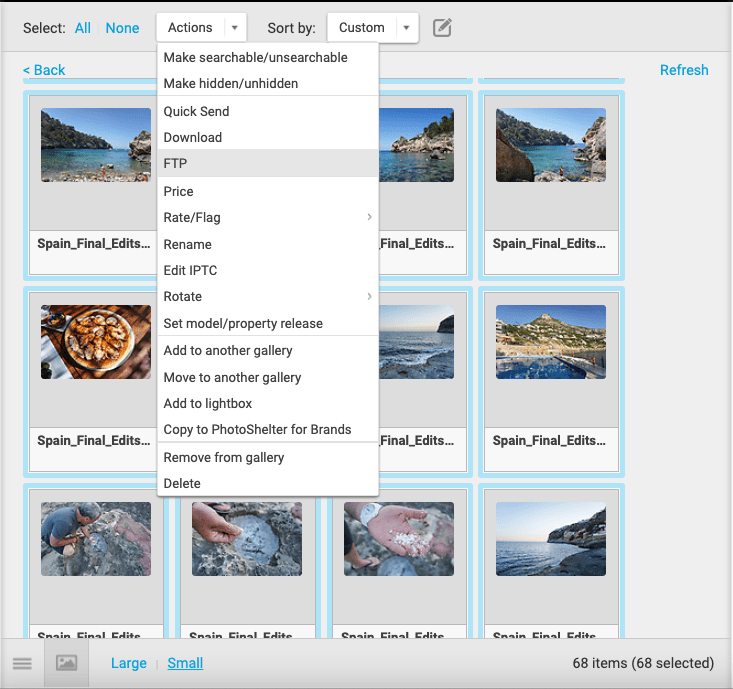
(Note: click to enlarge this image.)
In the event you want to offer downloads for anyone who visits your site, we also have an Anonymous Downloads option. After all, it’s not always about gating your work and setting specific permissions for specific clients. Sometimes, you need a way to eliminate roadblocks so anyone can download your images as quickly and easily as possible. As PhotoShelter’s most flexible and open download option, it lets you assign open download permissions for anyone — no passwords, no logins, no barriers. And just like the gated access options, you have full control over the download size, format and permission duration.

(Note: click to enlarge this image.)
Just remember!
If you’re allowing downloads on your PhotoShelter website, you need to make sure you’ve enabled download links to display in your Archive Page Settings!
To learn more about delivering photos securely and easily with PhotoShelter, visit our Support Center.
Not a PhotoShelter member? Want to try out our delivery tools for yourself? Get started today!
You May Also Like
-

Expert Advice and Top Tips from Pro Photographers for 2024
What’s one piece of advice you would give to aspiring or up-and-coming photographers? We asked nine experienced photographers and PhotoShelter members to share their top tips for those looking to get ahead in their photography careers. From finding your own visual voice to working with a mentor or photo assistant, each piece of advice listed […]
-

What’s On Your Photography Holiday Wish List?
The holiday season is around the corner and that means it’s the perfect opportunity to upgrade your gear or find that special gift for the visual storyteller or photography enthusiast in your life. We reached out to a handful of renowned photographers and PhotoShelter members, each with their unique styles and preferences, to bring you […]
-

Share a Photo That Means the World to You
We all have a photo that means the world to us. Maybe it’s one we made ourselves – the first photo from our first camera. It could be an old family photo in a beloved photo album. Or maybe it’s an iconic image that hangs on our wall at home. With World Photography Day coming […]